As you consider building a greenhouse, you’re likely aware of the high costs associated with traditional kits. However, with some planning and creativity, you can create your own DIY greenhouse without breaking the bank. Before you start, you can check out this video on DIY Greenhouse | Don’t Buy a Kit Until You See This to get inspired and learn valuable tips. You’ll be able to grow your own plants year-round, and your DIY greenhouse will be a valuable addition to your backyard.
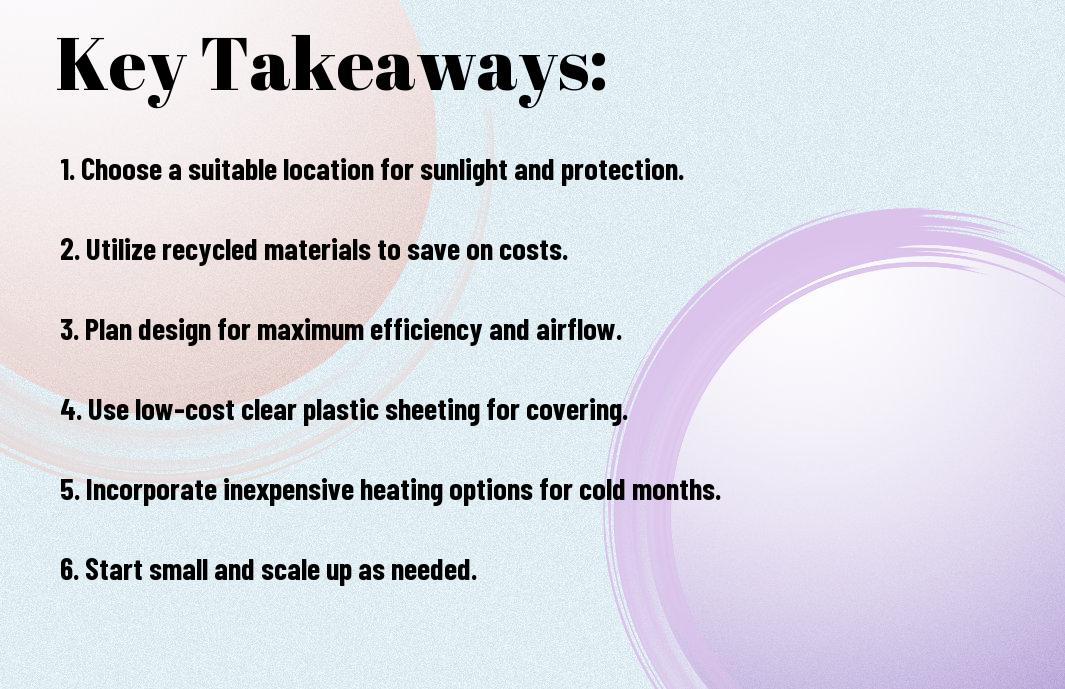
Key Takeaways:
To build a DIY greenhouse on a budget, consider the following points:
- Use recycled materials such as old windows, doors, and lumber to minimize costs and reduce waste. This approach can help you save money on initial construction expenses.
- Opt for a simple design that is easy to build and maintain, such as a hoop house or a cold frame. This will not only reduce construction costs but also make it easier to manage and repair your greenhouse.
- Utilize natural lighting and ventilation to regulate the temperature and atmosphere inside the greenhouse, reducing the need for artificial lighting and heating/cooling systems. This will help you save money on energy costs and create a healthier environment for your plants.
Planning Your DIY Greenhouse
A well-planned DIY greenhouse is necessary for a successful project. You need to consider your space, resources, and budget to build a functional and efficient greenhouse.
Assessing Your Space and Resources
Your available space and resources will determine the size and type of greenhouse you can build. You should evaluate your yard, considering factors like sunlight, wind direction, and accessibility.
Setting a Budget and Timeline
By establishing a clear budget and timeline, you can ensure your project stays on track. You should set realistic goals and priorities to achieve your desired outcome.
It is necessary to break down your budget into components like materials, tools, and labor to get a clear picture of your expenses. You can then allocate your resources effectively, making adjustments as needed to stay within your budget and complete your greenhouse on time, allowing you to enjoy your new space sooner.
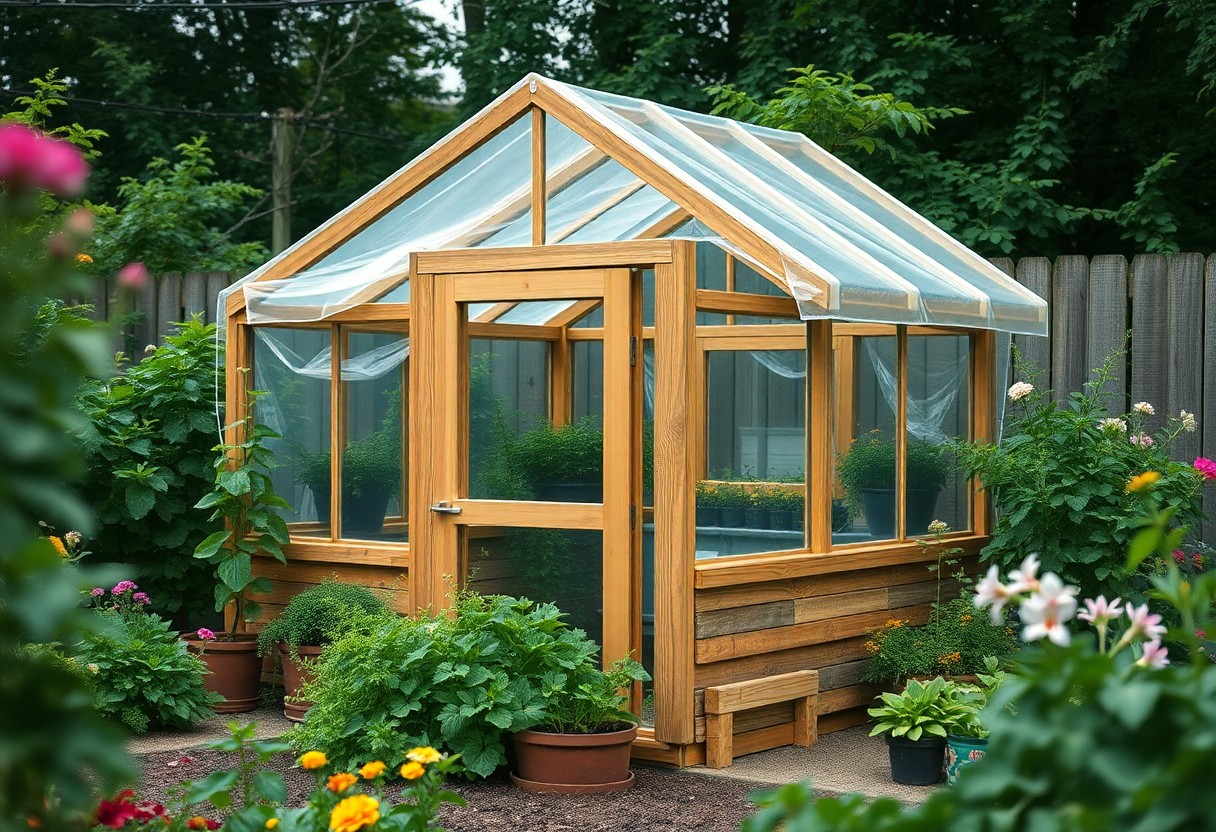
Choosing the Right Materials
If you’re looking to build a DIY greenhouse on a budget, selecting the right materials is vital. You’ll want to consider the durability, sustainability, and cost of the materials you choose, as they will impact the overall structure and functionality of your greenhouse.
Selecting Frames and Coverings
One of the most important decisions you’ll make is choosing the frames and coverings for your greenhouse. You’ll need to decide on a frame material, such as wood or metal, and a covering, such as glass or plastic, that fits your budget and meets your needs.
Considering Insulation and Ventilation Options
Covering the basics of insulation and ventilation is vital to creating a stable environment for your plants. You’ll want to explore different options, such as shading materials and venting systems, to ensure your greenhouse maintains a healthy temperature and humidity level.
Options for insulation and ventilation will depend on your climate and the specific needs of your plants. You’ll need to consider factors such as heat retention, air circulation, and moisture control when selecting your insulation and ventilation materials, and you can choose from a range of products, including foam board, straw bales, and automatic vent openers, to create a well-regulated environment for your plants to thrive.
Building the Greenhouse Structure
Once again, you’ll need to plan carefully to ensure your greenhouse structure is sturdy and well-built. You’ll be using your DIY skills to create a functional and comfortable space for your plants to thrive.
Constructing the Frame
Prior to starting, you should gather all the necessary materials, such as wooden beams and screws, to construct the frame of your greenhouse. You will need to ensure that it is square and level to provide a solid foundation.
Installing Roofing and Walls
Anyway, you will need to install roofing and walls to enclose your greenhouse, using materials like polycarbonate panels or glass. You should follow the manufacturer’s instructions to ensure a secure and watertight seal.
But as you install the roofing and walls, you should consider factors like ventilation, insulation, and drainage to create an optimal growing environment for your plants. You will need to balance these factors to ensure your greenhouse functions effectively and provides the best conditions for your plants to grow and thrive.
Installing Essential Systems
Unlike other projects, building a DIY greenhouse requires careful planning of its systems. You can find inspiration and guidance on how to Build a DIY Greenhouse with One of These Easy Kits to ensure your project is a success.
Heating and Cooling Systems
Before installing any systems, consider your greenhouse’s heating and cooling needs to maintain a stable temperature for your plants.
Irrigation and Lighting Systems
At this stage, you’ll need to plan your irrigation and lighting systems to provide your plants with the necessary water and light.
Another important aspect of irrigation and lighting systems is automating them to ensure your plants receive the right amount of water and light, even when you’re not around to monitor them, allowing you to optimize your greenhouse’s conditions for optimal growth.
Adding Finishing Touches
After completing the structure of your DIY greenhouse, you can now focus on the final details. For inspiration, you can visit Build a Simple, Inexpensive Greenhouse to get ideas on how to enhance your greenhouse.
Shelving and Bedding
On the inside of your greenhouse, you will need to install shelving and bedding to accommodate your plants. You can use recycled materials or purchase affordable options to fit your budget.
Decorative Elements and Features
Any additional features you add will enhance the overall aesthetic of your greenhouse. Consider adding a trellis or a small seating area to make your space more inviting.
With your shelving and bedding in place, you can now think about the decorative elements that will make your greenhouse unique. You can add personal touches such as wind chimes, statues, or a sundial to create a peaceful atmosphere, making your DIY greenhouse a haven for you to relax and tend to your plants.
Maintenance and Upkeep
Despite the initial effort of building your DIY greenhouse, you’ll need to perform regular tasks to ensure its longevity and optimal performance. You’ll be checking for damage, cleaning, and making adjustments as needed to maintain a healthy environment for your plants.
Regular Cleaning and Inspection
Upkeeping your greenhouse involves regularly cleaning and inspecting the structure, removing debris and dirt that can accumulate and obstruct sunlight and ventilation, allowing you to identify potential issues before they become major problems and affect your plants.
Seasonal Preparations and Repairs
Maintenance of your greenhouse varies by season, with tasks such as insulating for winter, ventilating for summer, and preparing for extreme weather conditions, you’ll be able to adapt your greenhouse to the changing seasons and protect your plants from harsh weather.
Hence, as you prepare your greenhouse for each season, you’ll be taking proactive steps to prevent damage and ensure your plants thrive, by doing so, you’ll be able to enjoy a healthy and productive greenhouse all year round, and make any necessary repairs to extend the life of your greenhouse, saving you time and money in the long run.
Summing up
On the whole, you now have the knowledge to build a DIY greenhouse on a budget. You can construct your own mini indoor garden using recycled materials and basic tools. By following the steps and tips provided, you can create a functional and cost-effective greenhouse that suits your needs, allowing you to grow your favorite plants year-round and enjoying the benefits of your own DIY project in your backyard.
FAQ
Q: What materials do I need to build a DIY greenhouse on a budget?
A: To build a DIY greenhouse on a budget, you will need a variety of materials, including a frame made of PVC pipes or wooden beams, transparent plastic sheeting or polycarbonate panels for the walls and roof, a door and windows for ventilation, and a foundation such as concrete or gravel. You may also want to consider using recycled or repurposed materials, such as old windows or a plastic bottle wall, to save money and make your greenhouse more sustainable. Additionally, you will need tools such as a drill, saw, and hammer to assemble the structure.
Q: What is the best location for a DIY greenhouse on a budget?
A: The best location for a DIY greenhouse on a budget is a spot that receives plenty of sunlight, is level, and is well-drained. It’s also important to consider the direction of the sun and the prevailing winds in your area, as this can affect the temperature and ventilation inside the greenhouse. A south-facing location is ideal, as it will receive the most sunlight throughout the day. You should also consider the accessibility of the location, as you will need to be able to easily get to the greenhouse to tend to your plants.
Q: How do I construct the frame of a DIY greenhouse on a budget?
A: Constructing the frame of a DIY greenhouse on a budget can be done using a variety of materials, including PVC pipes, wooden beams, or metal framing. The frame should be sturdy and able to support the weight of the plastic sheeting or polycarbonate panels, as well as any snow or wind loads. You can use a simple hoop house design or a more complex gable or Gothic arch style, depending on your needs and skill level. It’s a good idea to use a pre-made frame kit or consult with a professional if you are not experienced with building or construction.
Q: How do I provide ventilation and climate control in a DIY greenhouse on a budget?
A: Providing ventilation and climate control in a DIY greenhouse on a budget is important to prevent overheating and maintain a healthy environment for your plants. You can use a variety of methods, including automatic vents, manual windows, and shading materials such as shade cloth or louvers. You can also use fans or solar-powered ventilation systems to circulate the air and cool the greenhouse. Additionally, you can use thermal mass materials such as concrete or brick to absorb and release heat, helping to regulate the temperature inside the greenhouse.
Q: How much does it cost to build a DIY greenhouse on a budget, and what are some ways to save money?
A: The cost of building a DIY greenhouse on a budget can vary widely, depending on the size, materials, and complexity of the design. On average, a small DIY greenhouse can cost anywhere from $100 to $1,000 or more, depending on the materials and features. To save money, you can use recycled or repurposed materials, shop for second-hand or discounted materials, and keep the design simple. You can also consider building a mini or micro greenhouse, or using a pre-made kit or plan to simplify the construction process and reduce costs. Additionally, you can consider enlisting the help of friends or family members to share the labor and costs.