You’re fixin’ to build yourself a storage bench, and I’m here to guide you through it. With your trusty tools and a bit of elbow grease, you’ll be sittin’ pretty on your new bench in no time. Your backyard is about to get a whole lot more organized, and your neighbors will be green with envy. So, grab your hammer and let’s get started on this DIY adventure, where you’ll learn to build a sturdy outdoor storage bench that’s perfect for stashing your gear.
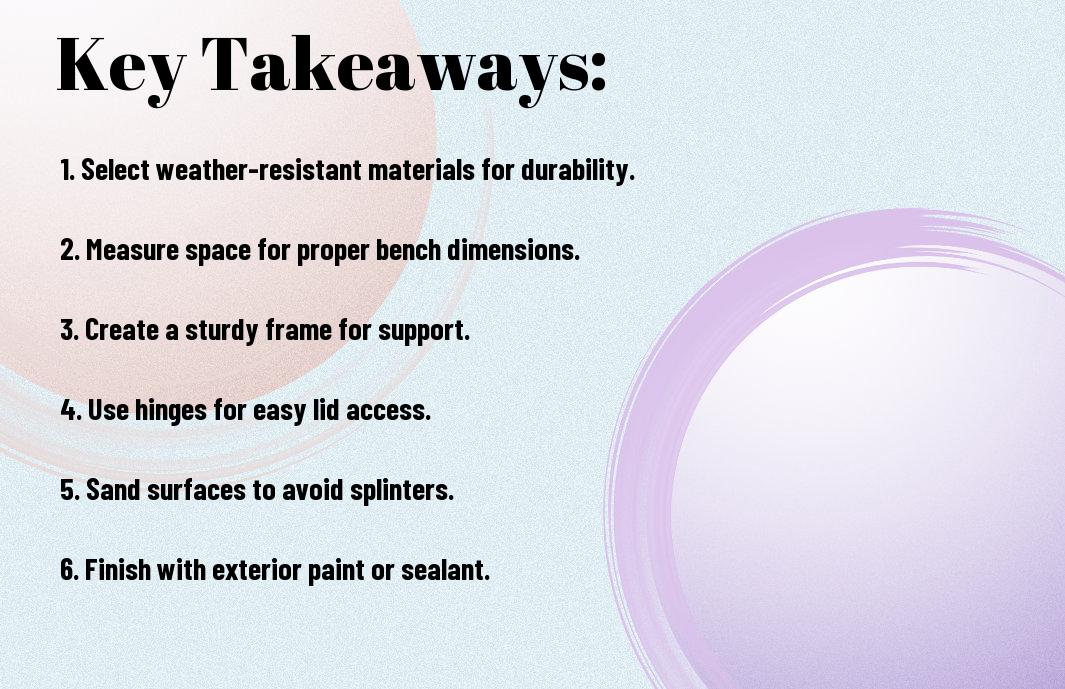
Key Takeaways:
To build a DIY outdoor storage bench, consider the following points:
- Choose the right materials, such as weather-resistant wood or composite materials, to ensure the bench can withstand various weather conditions.
- Consider the design and size of the bench to fit your outdoor space and storage needs, taking into account the style and functionality you want to achieve.
- Follow a step-by-step guide or plan to ensure a successful build, and don’t hesitate to add personal touches, such as cushions or decorations, to make the bench more comfortable and inviting.
Planning and Design
While planning your DIY outdoor storage bench, you’ll want to get some inspiration from the pros, so head on over to How to Build an Outdoor Storage Bench for some sweet ideas. This will help you get a sense of what you like and what will work for your space.
Measuring Your Space
To determine the perfect size for your bench, take stock of the area where it’ll live, considering the length, width, and any obstructions.
Choosing Materials
An imperative part of the process is selecting the right materials for your project, so consider what will withstand the elements and fit your style.
In fact, you’ll have a plethora of options to choose from, including cedar, reclaimed wood, and composite materials, each with its own unique characteristics and benefits, so take your time and pick the one that’s right for you and your outdoor storage bench vision.
Building the Frame
It seems like a daunting task, but building the frame of your outdoor storage bench is a straightforward process, and with the right tools, you’ll be done in no time, crafting a sturdy foundation for your bench.
Cutting the Lumber
Around this stage, you’ll start to see your project come together, and with your measurements in hand, you’ll begin cutting the lumber into the required pieces, making sure to follow your plan closely, as you set the stage for a solid frame.
Assembling the Structure
Against the backdrop of a well-cut set of lumber pieces, you’ll start assembling the structure, using your trusty drill and screws to bring the frame together, carefully ensuring that all corners are square and the entire thing is level, a feat that requires some patience, but yields great results.
Due to the simplicity of this design, you’ll find that assembling the structure is a breeze, and as you tighten the last screw, you’ll feel a sense of pride and accomplishment, knowing that your outdoor storage bench is starting to take shape, and with a few more steps, you’ll be enjoying your new creation, complete with a sturdy frame that will withstand the elements and provide ample storage for your outdoor gear, all thanks to your hard work and attention to detail.
Adding the Seat and Back
All the pieces are coming together, and now it’s time to add the seat and back to your outdoor storage bench. You’ll be attaching the seat slats and backrest, which will provide a comfortable place to sit and a sturdy back support.
Installing the Seat Slats
Across the frame, you’ll be placing the seat slats, spacing them evenly apart to create a sturdy and comfortable surface. You’ll use screws to secure them in place, making sure they’re level and evenly aligned.
Attaching the Backrest
By this point, you’re getting close to finishing your bench, and attaching the backrest is a significant step. You’ll be using screws to secure the backrest to the frame, making sure it’s at a comfortable angle and evenly aligned with the seat.
Plus, when attaching the backrest, you’ll want to make sure it’s sturdy enough to support your weight, so don’t be shy with the screws. You’ll also want to consider adding some extra support, like a horizontal slat or two, to give it some extra stability and ensure it can withstand the elements and frequent use. As you’re building this, you’re probably thinking about all the times you’ll be sitting on this bench, enjoying the outdoors, and you want to make sure it’s built to last. So, take your time, and get it just right, you’ll be glad you did.
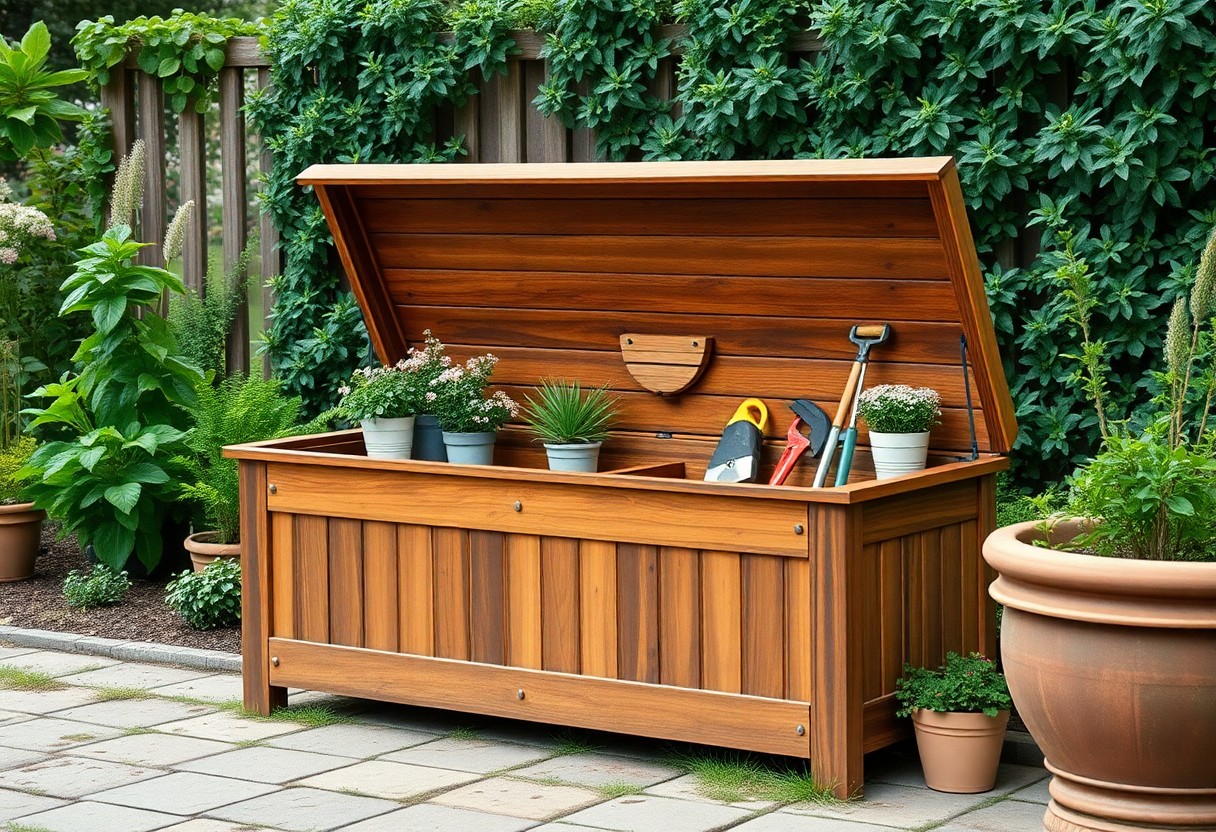
Installing Storage
Your outdoor storage bench is starting to take shape, and now it’s time to add the storage component, because let’s face it, you’ve got some stuff to stow.
Building the Storage Compartment
After constructing the frame, you’ll need to build the storage compartment. Here’s a breakdown of the materials you’ll need:
| Material | Quantity |
|---|---|
| Lumber | 2-3 pieces |
| Hinges | 2-3 sets |
Adding a Lid or Door
With the compartment built, you can now add a lid or door to keep your stored items secure and out of the elements. You’ll want to choose a design that fits your needs, whether it’s a simple lid or a more complex door system.
Indeed, adding a lid or door is where you can get creative and add some personality to your storage bench. You can choose from a variety of materials, such as wood or metal, and add decorative hardware to give it a unique look. As you’re building, you’ll be thinking about how you’ll use this bench, and what kind of items you’ll be storing, so choose a design that fits your lifestyle, and don’t be afraid to add your own personal touch.
Finishing Touches
Keep in mind that the final steps are just as important as the initial build, and you can find more information on How to Build a Simple and Beautiful Outdoor Storage Bench at this detailed guide. Now, let’s get to the fun part – making your bench look sharp!
Sanding and Staining
Behind the scenes of a beautiful finish lies a whole lot of sanding and staining, so get ready to put in some elbow grease, you’ll be happy with the outcome, trust me.
Adding Hardware and Decor
Any decorate details you add will give your bench some serious personality, so pick something that reflects your style, and have fun with it, you’re almost done!
Sanding down the wood to a smooth finish, you’ll be ready to add the hardware and decor that will make your outdoor storage bench truly shine, now it’s time to add a coat of polyurethane and attach the lid hinges, and any other decorative elements you like, you’ve earned it, your bench is looking great!
Safety Precautions
For your own well-being, take necessary precautions when building your DIY outdoor storage bench. You’ll be working with power tools and materials that can cause injury if not handled properly.
Protective Gear
Gearing up with the right equipment is vital, you’ll need safety glasses, a dust mask, and gloves to protect yourself from debris and splinters.
Electrical Safety
Avoiding electrical hazards is key, you should keep your work area clear of cords and wires, and never use power tools near water or in wet conditions.
It is also important to use ground fault circuit interrupter (GFCI) protected outlets when working with power tools, and to keep your tools well-maintained to prevent electrical shock, you don’t want to become a human lightning rod, so take your time and be mindful of your surroundings.
Summing up
Now that you’ve hammered your last nail, you’re left with a DIY outdoor storage bench that’s all your own. You’ve built something with your hands, and that’s something to be darn proud of. Your new bench is ready to hold all your outdoor goodies, and with a little maintenance, it’ll be serving you well for years to come. Pat yourself on the back, friend, you’ve earned it!
FAQ
Q: What materials do I need to build a DIY outdoor storage bench?
A: To build a DIY outdoor storage bench, you will need several materials, including 2×4 lumber for the frame, 3/4 inch plywood for the seat and shelf, exterior-grade wood screws, hinges, and a latch for the lid. You will also need weather-resistant wood glue, wood filler, and a waterproof sealant to protect the wood from the elements. Additionally, you may want to add a finish, such as paint or stain, to match the bench with your outdoor decor.
Q: What are the steps involved in building a DIY outdoor storage bench?
A: The steps involved in building a DIY outdoor storage bench include planning and designing the bench, cutting and assembling the frame, attaching the seat and shelf, installing the lid and hinges, and adding a finish. You will also need to add a back and armrests, if desired, and attach the lid with a latch or other closing mechanism. It’s also important to ensure that the bench is level and secure to prevent it from tipping over.
Q: How do I ensure that my DIY outdoor storage bench is waterproof and durable?
A: To ensure that your DIY outdoor storage bench is waterproof and durable, you should use exterior-grade materials and apply a waterproof sealant to all surfaces. You should also install a lid with a watertight seal and use hinges and a latch that are designed for outdoor use. Additionally, you can add a layer of protection by applying a finish, such as paint or stain, and regularly inspecting and maintaining the bench to prevent damage from the elements.
Q: Can I customize my DIY outdoor storage bench to fit my specific needs and decor?
A: Yes, you can customize your DIY outdoor storage bench to fit your specific needs and decor. You can choose the size, style, and materials to match your outdoor space and add features, such as cup holders, a storage compartment, or a planter. You can also add a cushion or pillows to make the bench more comfortable and inviting. Additionally, you can use different types of wood or finishes to match the bench with your existing outdoor furniture and decor.
Q: What safety considerations should I keep in mind when building and using a DIY outdoor storage bench?
A: When building and using a DIY outdoor storage bench, you should keep in mind several safety considerations, including ensuring that the bench is stable and level, using secure latches and hinges, and keeping the bench away from hazards, such as water and electrical sources. You should also use proper lifting techniques when moving the bench and avoid overloading it with heavy items. Additionally, you should regularly inspect the bench for damage and wear, and make repairs as needed to prevent accidents and injuries.
