Home and Garden

How to Create a Zen-Inspired Living Space

You’re looking to transform your home into a peaceful oasis, and a Zen-inspired living space is your goal. You want to create an atmosphere that promotes relaxation and calmness. Your journey begins with simplicity and clarity. You will learn how to declutter, select minimal decor, and incorporate natural elements to bring serenity into your life. By following these steps, you will be able to design a space that reflects your inner peace and tranquility.

Key Takeaways:

To create a serene and peaceful living space, consider the following points:

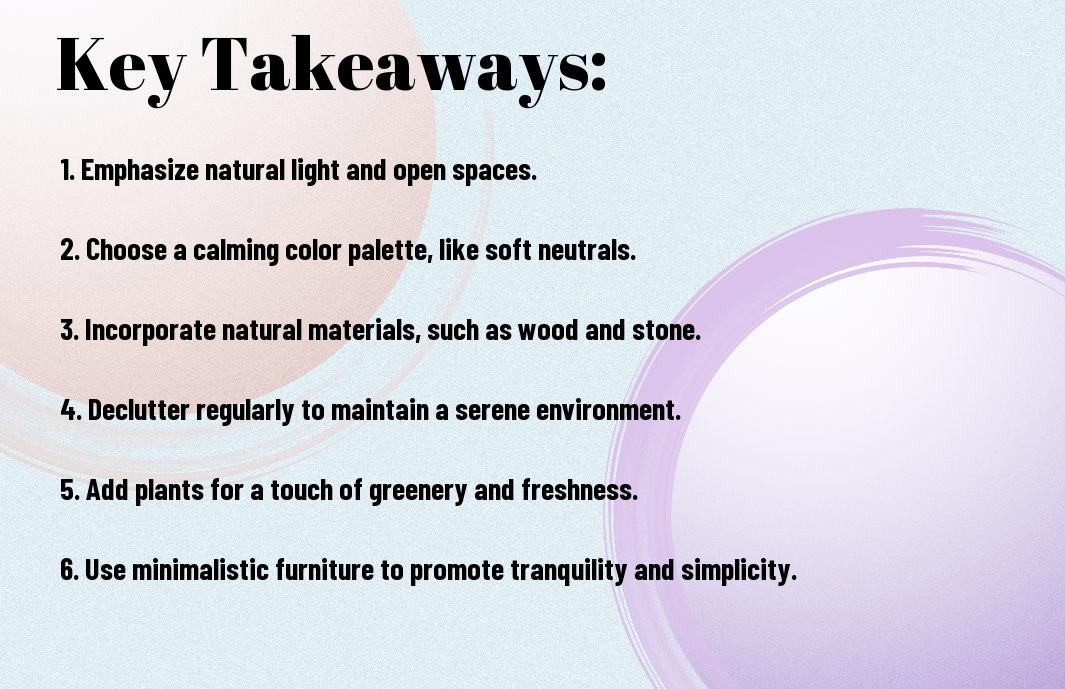
  • Emphasize Natural Light and Minimalism by using sheer curtains, decluttering, and opting for a limited color palette to create a sense of calmness and clarity.
  • Incorporate Nature into your space by adding plants, a water feature, or a Zen garden to bring in a sense of balance and harmony.
  • Focus on Textiles and Colors that promote relaxation, such as soft fabrics, neutral tones, and Earth Tones, to create a cozy and inviting atmosphere.

Defining Zen Style

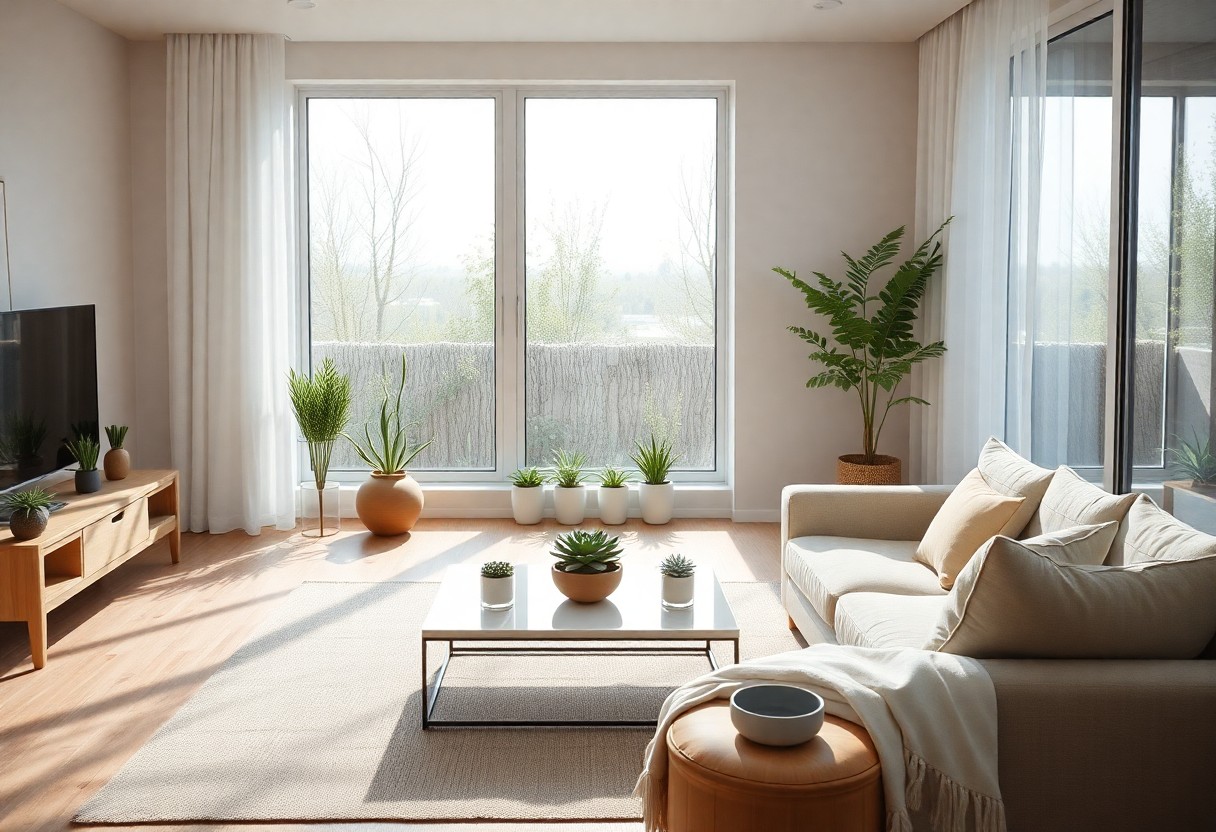
A well-designed Zen-inspired living space can bring a sense of calm and tranquility to your home. You can achieve this by incorporating simple and natural elements into your decor.

Origins and Principles

Any introduction to Zen style must consider its origins in Japanese culture, where it emphasizes simplicity and mindfulness. You will find that Zen principles focus on creating a sense of balance and harmony in your living space.

Key Elements

For a Zen-inspired living space, you will want to focus on natural materials, such as wood and stone, and minimal decor. You can use these elements to create a sense of calm and simplicity in your home.

Principles of Zen style guide your selection of key elements, helping you choose items that promote a sense of serenity and peace. You will find that applying these principles helps you create a living space that is both beautiful and functional, allowing you to relax and unwind in your home.

Color Schemes and Lighting

Even the most minimalistic spaces can benefit from thoughtful color schemes and lighting. You can create a calming atmosphere by choosing soothing colors and optimizing natural light. Your goal is to design a space that promotes relaxation and serenity.

Calming Colors

Color selection is key to creating a zen-inspired living space. You will want to focus on muted, natural hues such as beige, gray, and blue, which can help you unwind and feel more at ease in your environment.

Natural Light

One of the most effective ways to enhance your space is by utilizing natural light. You can achieve this by keeping windows unobstructed and using sheer curtains to filter the light, creating a sense of calm and tranquility.

In fact, natural light can have a profound impact on your mood and overall well-being. You can amplify its effects by positioning mirrors strategically to reflect the light, making your space feel brighter and more expansive, and helping you connect with the outdoors from the comfort of your own home.

Furniture and Decor

Not everything needs to be brand new when creating a zen-inspired living space. You can repurpose or upcycle existing items to add character to your space.

Minimalism

Around your living space, adopt a mindset that values simplicity and clarity, allowing you to focus on what’s truly important. You’ll find that your space feels more serene and peaceful.

Natural Materials

Beside the benefits of sustainability, natural materials like wood and bamboo bring warmth and texture to your space, creating a cozy and inviting atmosphere. You can incorporate these elements through furniture, flooring, or decorative accents.

Another way to emphasize natural materials is by bringing the outdoors in, using elements like plants, stones, or water features to create a sense of balance and harmony in your space. You can place a small herb garden on your windowsill or a vase with branches on your coffee table to add a touch of nature to your decor.

Textures and Patterns

Unlike other design elements, textures and patterns in a Zen-inspired space should be simple and understated. You can find inspiration for creating a peaceful atmosphere in your home by visiting 1 To Zen – 10 Easy Steps To Creating A Zen Home Interior guide.

Incorporating Nature

About bringing the outdoors in, you can add plants, natural fibers, and elements like wood or stone to create a sense of calm in your space.

Balance and Harmony

After selecting your textures and patterns, you will need to balance them to achieve harmony in your Zen-inspired space, which you can do by limiting your choices and using them thoughtfully.

Achieving balance and harmony is key to creating a Zen-inspired living space. You can do this by considering the visual weight of each element and arranging them in a way that feels peaceful and calming to you. By doing so, you will create a space that promotes relaxation and serenity.

Organizing Your Space

To create a zen-inspired living space, you need to start by organizing your belongings and surroundings. This involves decluttering and rearranging your space to promote a sense of calm and serenity.

Decluttering

Along with simplifying your life, getting rid of unnecessary items will help you focus on what’s truly important. You’ll be able to see what you have and make the most of your space.

Functional Layout

Above all, your space should be easy to navigate and functional. You want to be able to move effortlessly from one area to another without feeling overwhelmed or distracted.

Your functional layout should also take into account your daily routines and habits. Consider the path you take through your home and how you can arrange your furniture to make it more efficient. By doing so, you’ll be able to create a sense of flow and harmony in your living space, making it feel more peaceful and zen-inspired.

Bringing in Nature

Many ways to create a zen-inspired living space involve connecting with nature. You can find inspiration for your design by visiting Zen Decorating Ideas to get started.

Plants and Greenery

Around this time, you’ll want to consider adding plants to your space, as they help purify the air and create a calming atmosphere, making your living space feel more serene.

Outdoor Elements

Any outdoor elements you bring into your home, such as a water feature or natural textures, can enhance the zen ambiance and make your space feel more connected to nature.

Hence, you can incorporate outdoor elements, like stones or reclaimed wood, into your design to add warmth and coziness to your space, making it feel more inviting and peaceful, allowing you to unwind and relax in your zen-inspired living space.

Summing up

To wrap up, you have now learned the necessarys of creating a Zen-inspired living space. You can simplify your life by applying these principles to your home, making it a calm and serene oasis. Your newfound knowledge will help you design a space that promotes relaxation and clarity, allowing you to unwind and reconnect with your inner self in your own tranquil atmosphere.

FAQ

Q: What is the first step in creating a Zen-inspired living space?

A: To create a Zen-inspired living space, the first step is to declutter and minimalize your surroundings. This involves getting rid of any unnecessary items, reducing clutter, and organizing your belongings in a way that promotes a sense of calm and serenity. By doing so, you will be able to create a blank canvas that allows you to design a space that is truly reflective of the Zen philosophy, which emphasizes the importance of simplicity and clarity.

Q: How can I incorporate natural elements into my Zen-inspired living space?

A: Incorporating natural elements is an vital part of creating a Zen-inspired living space. You can do this by adding plants, using natural materials such as wood and stone, and bringing in elements of nature like water features or a bowl of river rocks. Additionally, consider using natural textiles like bamboo, hemp, or cotton to add warmth and texture to your space. By bringing the outdoors in, you can create a sense of harmony and balance that is characteristic of Zen design.

Q: What colors are typically used in a Zen-inspired living space?

A: The color palette used in a Zen-inspired living space is typically muted and calming, with a focus on neutral tones such as beige, gray, and white. These colors help to create a sense of calmness and serenity, and can be used on walls, furniture, and accessories. You can also incorporate earthy tones like brown and green to add depth and warmth to your space. Avoid using bold or bright colors, as they can disrupt the peaceful atmosphere that is characteristic of a Zen-inspired living space.

Q: How can I use lighting to create a Zen-inspired atmosphere in my living space?

A: Lighting can play a significant role in creating a Zen-inspired atmosphere in your living space. Consider using soft, warm lighting like candles, lanterns, or floor lamps to create a sense of warmth and coziness. Avoid using harsh overhead lighting, as it can create a sense of tension and stress. Instead, use table lamps or floor lamps to create pools of light that can help to define different areas of your space and create a sense of intimacy. You can also use natural light to your advantage by placing furniture and decor near windows to maximize the amount of natural light in your space.

Q: What types of furniture and decor are typically used in a Zen-inspired living space?

A: The furniture and decor used in a Zen-inspired living space are typically simple, clean-lined, and functional. Consider using low-profile furniture with straight lines and minimal ornamentation, such as a low-slung sofa or a simple wooden coffee table. You can also incorporate decorative elements like woven baskets, natural fiber rugs, and simple artwork to add texture and visual interest to your space. Avoid using cluttered or overly ornate decorations, as they can disrupt the sense of calmness and serenity that is characteristic of a Zen-inspired living space. Instead, opt for simple, understated pieces that promote a sense of peace and tranquility.

The Best Shrubs for Year-Round Interest

As you plan your garden, you’re likely looking for shrubs that will provide beauty and appeal throughout the year. You want your outdoor space to be vibrant and engaging, regardless of the season. With so many options available, choosing the right shrubs can be overwhelming. You’ll want to select varieties that offer a mix of flowering, foliage, and texture to keep your garden interesting all year round, and this guide will help you make informed decisions to enhance your outdoor space.

Key Takeaways:

To maintain a vibrant garden throughout the year, selecting the right shrubs is vital. Here are a few key points to consider:

  • Choose shrubs with Varied Foliage to ensure a dynamic display of colors and textures across different seasons, from the deep greens of winter to the vibrant hues of spring and summer.
  • Select shrubs that offer Seasonal Blooms, providing a constant source of flowers and fragrance that attract pollinators and add beauty to the garden during different times of the year.
  • Incorporate shrubs with Winter Interest, such as those with bright berries, interesting bark, or evergreen leaves, to keep the garden visually appealing even in the colder months.

Evergreen Shrubs

While choosing shrubs for your garden, consider evergreen options for year-round interest. These shrubs maintain their foliage throughout the year, providing a constant display of color and texture. You can select from a variety of species, each with unique characteristics to suit your garden’s needs.

Boxwood and Topiary

Below the lush canopy of larger trees, you can plant boxwood and topiary shrubs to add depth and structure to your garden. You can shape these shrubs into intricate designs, adding a touch of elegance to your outdoor space.

Holly and Yew

At the heart of a beautiful garden are shrubs like holly and yew, which provide year-round interest with their attractive foliage and colorful berries. As you plan your garden, consider incorporating these shrubs to create a stunning display of color and texture that will attract birds and other wildlife to your outdoor space, making it a haven for you to enjoy throughout the year.

Spring Flowering Shrubs

Even as the last wisps of winter’s chill dissipate, your garden can burst into vibrant life with the right spring flowering shrubs, offering a kaleidoscope of colors and fragrances that will elevate your outdoor space.

Azalea and Rhododendron

Blooming abundantly, Azalea and Rhododendron shrubs are stunning additions to your spring garden, providing a spectacle of colorful blooms that will leave you in awe.

Lilac and Forsythia

Lovely Lilac and Forsythia shrubs are among the first to herald spring’s arrival in your garden, ushering in the new season with their beautiful flowers and sweet fragrance.

Azalea aside, when you consider Lilac and Forsythia, you’ll find that these shrubs offer more than just a fleeting display of color; they provide a structural element to your garden throughout the year, with Lilac’s conical blooms and Forsythia’s arching branches creating a striking backdrop for other plants to flourish.

Summer Interest

Despite the heat, you can still enjoy vibrant shrubs in your garden. For inspiration, check out 31 Flowering Shrubs for Year-Round Color to find the perfect fit for your garden.

Hydrangea and Viburnum

Along with other varieties, you’ll find that hydrangea and viburnum offer beautiful blooms and attractive foliage, making them great additions to your summer garden.

Rose and Lavender

The rose and lavender shrubs provide a fragrant and stunning display of color, perfect for your outdoor space, and you can choose from a variety of types to suit your taste.

Viburnum and other flowering shrubs, like rose and lavender, can add depth and interest to your garden, and as you consider your options, you’ll find that choosing the right shrubs will enhance your overall outdoor experience, allowing you to enjoy your garden throughout the summer months.

Autumn Color

Keep your garden vibrant during the autumn season with shrubs that offer striking foliage and colorful displays. You can choose from a variety of species that provide beautiful autumn color, adding depth and interest to your landscape.

Burning Bush and Maple

For a dramatic display of autumn color, consider planting Burning Bush or Maple shrubs in your garden. You will be treated to vibrant red and orange hues that will add a pop of color to your landscape during the fall season.

Oakleaf Hydrangea and Barberry

Above all, Oakleaf Hydrangea and Barberry are excellent choices for autumn interest, offering stunning fall foliage and attractive berries that will add beauty to your garden. You can enjoy the unique textures and colors they provide, making your garden a beautiful haven.

The Oakleaf Hydrangea and Barberry shrubs are great additions to your garden, as they provide year-round interest and require minimal maintenance. You can plant them in well-draining soil and enjoy their beautiful display of autumn color, as well as their attractive flowers and berries during other times of the year, making them a great choice for your landscape.

Winter Interest

Not all shrubs go dormant in winter, and you can enjoy year-round interest with the right choices. Look for shrubs with attractive bark, berries, or evergreen foliage to add winter appeal to your garden.

Snowberry and Winterberry

One of the best options for winter interest is shrubs with persistent berries, such as snowberry or winterberry, which provide a pop of color in your winter landscape, attracting birds and other wildlife to your garden.

Ornamental Grasses and Bark

Any gardener can appreciate the beauty of ornamental grasses and interesting bark, which add texture and visual interest to your winter garden, providing a unique landscape even in the coldest months.

Bark can be a stunning feature in your winter garden, with options like paperbark maple or river birch offering a beautiful, peeling bark that adds depth and character to your landscape, and when combined with ornamental grasses, creates a striking winter scene that you will enjoy from the comfort of your home.

Maintenance and Care

Your shrubs will require regular maintenance to ensure they continue to thrive and provide year-round interest, this includes pruning, fertilizing, and watering, all of which will help maintain their health and appearance.

Pruning and Deadheading

Besides regular upkeep, pruning and deadheading are important for promoting healthy growth and encouraging blooming, you will need to remove dead or damaged branches and spent flowers to keep your shrubs looking their best.

Fertilization and Watering

Deadheading aside, fertilization and watering are also vital for the health of your shrubs, you should fertilize them at the appropriate time of year and water them regularly, but avoid overwatering which can be detrimental to their health.

Plus, when it comes to fertilization and watering, you will want to consider the specific needs of each shrub, as some may require more or less of either, and you should also take into account the climate and soil type in your area to ensure you are providing your shrubs with the best possible care.

Final Words

With these considerations, you can create a stunning landscape with the best shrubs for year-round interest. You will find the perfect additions to your garden by exploring 9 Evergreen Shrubs for Year-Round Interest, enhancing your outdoor space with beauty and vibrancy throughout the year, making your yard a haven that you will enjoy all year round.

FAQ

Q: What are the best shrubs for year-round interest in my garden?

A: The best shrubs for year-round interest are those that provide a combination of beautiful flowers, attractive foliage, and interesting berries or bark. Some examples include Hydrangea, Viburnum, and Holly. These shrubs offer a dynamic display of colors and textures throughout the seasons, from vibrant blooms in the spring and summer to rich foliage and berries in the fall and winter.

Q: How do I choose the right shrubs for my climate and soil type?

A: To choose the right shrubs for your climate and soil type, consider factors such as hardiness zone, sun exposure, and soil pH. For example, if you live in a cooler climate, choose shrubs like Boxwood or Yew that are tolerant of frost and cold temperatures. If you have poor soil, consider shrubs like Lilac or Forsythia that are adaptable to a range of soil conditions. Consult with a local nursery or gardening expert to determine the best shrubs for your specific region and soil type.

Q: What are some low-maintenance shrubs for year-round interest?

A: Some low-maintenance shrubs for year-round interest include shrubs like Burning Bush, Barberry, and Russian Cypress. These shrubs are drought-tolerant, disease-resistant, and require minimal pruning, making them perfect for busy gardeners or those new to gardening. They still offer beautiful foliage, flowers, or berries, but with less upkeep and care.

Q: Can I grow shrubs in containers for year-round interest?

A: Yes, many shrubs can be grown in containers for year-round interest. Choose compact or dwarf varieties of shrubs like Azalea, Rhododendron, or Camellia, and select a container that is large enough to accommodate the mature size of the shrub. Make sure the container has good drainage and use a well-draining potting mix to prevent waterlogged soil. Container-grown shrubs may require more frequent watering and fertilization, but they can thrive with proper care.

Q: How often should I prune my shrubs to maintain year-round interest?

A: The frequency of pruning depends on the type of shrub and its growth habits. Some shrubs, like Hydrangea and Lilac, require annual pruning to maintain shape and promote blooming. Others, like Boxwood and Yew, may need regular pruning to maintain a formal shape or hedge. Prune shrubs at the right time of year, typically in late winter or early spring, and remove any dead, diseased, or damaged branches to maintain the health and appearance of the shrub. Consult with a gardening expert or check the specific pruning requirements for your shrub variety to ensure you are pruning correctly.

How to Install a DIY Watering System

You’re looking to save time and water by installing a DIY watering system. You’ve come to the right place. Your garden will thrive with a well-planned irrigation system, and you can set it up yourself with a few simple steps. You’ll learn how to design and install a system that meets your garden’s unique needs, and you’ll be enjoying the benefits of a lush, healthy garden in no time. You’ll find the process easier than you think, and your plants will thank you.

Key Takeaways:

To set up an efficient irrigation system for your garden or yard, consider the following points:

  • Start by planning the layout of your DIY watering system, taking into account the water source, pipe size, and valve placement to ensure adequate water pressure and distribution.
  • Choose the right irrigation components, including tubes, sprinklers, and drip irrigation systems, to suit your specific plant needs and climate conditions.
  • Test and maintain your DIY watering system regularly to prevent leaks, clogs, and other issues, and make adjustments as needed to optimize water efficiency and plant growth.

Planning Your System

The first step in installing a DIY watering system is to plan your system carefully. You will need to consider your garden’s size, layout, and watering needs to determine the best approach.

Assessing Your Garden Needs

Any gardener knows that understanding your garden’s specific requirements is key to creating an effective watering system. You should assess your garden’s soil type, climate, and plant species to determine the right amount of water and frequency of watering.

Choosing the Right Materials

Adept gardeners select materials that are durable and suitable for their garden’s conditions. You should choose pipes, fittings, and irrigation heads that are resistant to corrosion and can withstand your garden’s climate.

This selection process involves considering factors such as water pressure, flow rate, and UV resistance. You will need to evaluate your options and choose materials that meet your garden’s specific needs, ensuring a reliable and efficient watering system that will save you time and water.

Preparing the Site

Any homeowner can install a DIY watering system with ease, and you can start by checking out this guide on how to Create a DIY Sprinkler System for Watering Your Garden to get an idea of what you’ll need.

Clearing the Area

Beneath the surface of your yard, you’ll find the perfect spot to begin, so start by clearing the area of any debris or obstructions that could interfere with your system.

Laying Out the System

Preferably, you’ll want to lay out your system in a way that maximizes water distribution, so consider the size and shape of your yard as you plan.

To ensure your system is effective, you’ll need to map out the best route for your pipes and sprinklers, taking into account the water pressure and flow rate, and you can use a garden hose to test the layout before you start digging.

Installing Pipes and Fittings

Once again, you’ll need to gather your materials and tools before starting this step. You’ll be working with pipes, fittings, and valves to create a network that distributes water to your plants. Make sure you have a clear plan and layout to follow.

Cutting and Connecting Pipes

Across the board, cutting and connecting pipes requires precision and attention to detail. You’ll need to measure and cut your pipes to the right length, then connect them using fittings such as couplers and elbows.

Securing Fittings and Valves

Similarly, securing your fittings and valves is imperative to prevent leaks and ensure a smooth flow of water. You’ll need to tighten all connections firmly, but avoid over-tightening, which can damage the pipes or fittings.

Consequently, as you secure your fittings and valves, you’ll want to double-check your work to make sure everything is tightened properly. You can test your system by turning on the water supply and checking for leaks. This will help you identify any issues before you’ve completed the installation, saving you time and hassle in the long run. You’ll be able to enjoy the benefits of your DIY watering system, knowing that you’ve done the job correctly.

Setting Up the Water Source

Despite the variety of options, choosing the right water source is straightforward. You’ll need to select a water source, such as a hose or rainwater tank, to supply your DIY watering system.

Connecting to a Water Supply

Across your yard, you’ll find the perfect spot to connect your watering system to a water supply, ensuring it’s easily accessible and out of the way.

Installing a Pump or Timer

For your system to work efficiently, you’ll need to install a pump or timer, which will help regulate water flow and pressure, allowing you to customize your watering schedule.

Plus, when installing a pump or timer, you’ll want to consider factors such as water pressure, flow rate, and power source, ensuring your system operates smoothly and effectively, and you can enjoy the benefits of your new DIY watering system, with your plants thriving under your careful management.

Implementing Water Conservation Measures

All water conservation efforts start with a plan, and you can find valuable information on How To Install An Irrigation System to get started. This will help you make the most of your DIY watering system.

Using Rainwater Collection Systems

Around your home, you can implement rainwater collection systems to reduce your water bill and minimize waste.

Incorporating Drip Irrigation

By installing drip irrigation, you will be able to deliver water directly to the roots of your plants, reducing evaporation and runoff.

Conservation of water is key when designing your DIY watering system, and incorporating drip irrigation is an effective way to achieve this, as you will be able to control the amount of water your plants receive, ensuring that they get exactly what they need to thrive, and you can make adjustments as you see fit to optimize your system for your specific plants and climate.

Testing and Maintenance

Many factors can affect your DIY watering system’s performance, so it’s vital to test and maintain it regularly. You’ll want to ensure your system is working correctly and make any necessary adjustments.

Initial System Test

Maintenance begins with an initial test to verify that your system is functioning as expected. You should check for leaks, proper water pressure, and that all components are working together seamlessly.

Regular Maintenance Tasks

Guarding against issues like clogs and wear on your system requires regular checks. You should inspect your DIY watering system periodically to ensure it continues to operate efficiently.

In fact, performing these regular maintenance tasks will help you identify and fix problems before they become major issues, saving you time and money in the long run. You’ll be able to enjoy the benefits of your DIY watering system, knowing that your plants are receiving the right amount of water, and that your system is running smoothly and effectively.

Final Words

Upon reflecting on your DIY watering system installation, you should feel accomplished knowing you’ve created a efficient way to care for your plants. You’ve successfully set up a system that will save you time and water, and your plants will thrive as a result. With your new system in place, you can now enjoy the benefits of a well-hydrated garden with minimal maintenance, and you can be proud of the work you’ve done to make it happen with your own hands.

FAQ

Q: What are the basic components of a DIY watering system and where can I find them?

A: A DIY watering system typically consists of a water source, tubing, fittings, emitters or sprinklers, and a timer or controller. You can find these components at most hardware stores, home improvement centers, or online retailers that specialize in gardening and irrigation supplies. Make sure to choose components that are compatible with each other and suitable for your specific watering needs.

Q: How do I determine the right size and type of tubing for my DIY watering system?

A: The size and type of tubing you need will depend on the size of your garden, the water pressure in your area, and the type of plants you are watering. Generally, 1/2″ or 1/4″ tubing is suitable for most residential gardens. Consider using tubing made from durable, UV-resistant materials such as PVC or polyethylene. You can also use online calculators or consult with a gardening expert to determine the optimal tubing size for your specific needs.

Q: How do I design a DIY watering system that ensures even water distribution and prevents overwatering?

A: To design an efficient DIY watering system, start by creating a map of your garden, including the location of plants, trees, and other features. Determine the water requirements of each plant species and group plants with similar watering needs together. Use emitters or sprinklers that are designed to deliver water at a consistent rate, and space them evenly to ensure uniform coverage. Consider using a drip irrigation system, which delivers water directly to the roots of the plants, reducing evaporation and runoff.

Q: Can I install a DIY watering system on a slope or uneven terrain, and if so, how?

A: Yes, you can install a DIY watering system on a slope or uneven terrain. To do so, use fittings and tubing that can accommodate the changing elevation and ensure a consistent water flow. You may need to use additional components such as risers, reducers, or elbow fittings to navigate the terrain. Consider using a pressure-compensating drip irrigation system, which can maintain a consistent water flow even on slopes or uneven terrain. It’s also important to ensure that the system is properly secured to the ground to prevent damage from wind or erosion.

Q: How often should I inspect and maintain my DIY watering system to ensure it continues to function efficiently?

A: Regular inspection and maintenance are important to ensure your DIY watering system continues to function efficiently and effectively. Check the system at least once a month for signs of wear, tears, or clogs, and inspect the emitters or sprinklers for mineral buildup or debris. Clean or replace clogged emitters or filters, and check the tubing for cracks or damage. Additionally, adjust the timer or controller as needed to account for changes in weather patterns or plant growth, and consider running the system for a few minutes after maintenance to ensure it’s working correctly.

How to Decorate Your Fence With Plants

You stand in your yard, gazing at the plain fence that surrounds it. You want to add some life to this barren space. With a few simple steps, you can transform your fence into a lush oasis. You’ll learn how to choose the right plants, train them to climb, and maintain their beauty. Your fence will soon be a vibrant backdrop for your outdoor living space, inviting you to relax and enjoy nature’s splendor.

Key Takeaways:

To enhance the beauty of your outdoor space, consider the following points when decorating your fence with plants:

  • Choose climbing plants like ivy or clematis to cover your fence, adding a touch of nature and beauty to your yard.
  • Select flowering plants or shrubs that match your desired color scheme and climate to create a visually appealing display.
  • Use hanging baskets or planters to add dimension and variety to your fence, allowing you to showcase your favorite plants and create a unique outdoor landscape.

Choosing the Right Plants

Before you start decorating your fence, consider the climate and soil type in your area. You’ll want to choose plants that thrive in your local conditions, ensuring they’ll grow and flourish with minimal maintenance. This will help you narrow down your options and select the perfect plants for your fence.

Selecting Climbing Plants

Almost any climbing plant can be used to decorate your fence, such as roses, clematis, or ivy. You can train these plants to grow up your fence, adding a touch of elegance and beauty to your outdoor space.

Selecting Ground Cover Plants

Across the base of your fence, you can plant creeping thyme, sedum, or vinca minor. You can use these plants to create a lush, verdant carpet that spills out from beneath your fence, softening its edges and adding visual interest.

Climbing up your fence or spreading out at its base, your chosen plants will bring a new dimension to your outdoor space. You’ll find that with the right plants, your fence becomes a beautiful garden feature, rather than just a boundary marker. As you tend to your plants, you’ll appreciate the way they enhance your fence, and your entire yard.

Preparing Your Fence

One of the first steps in decorating your fence with plants is to assess its current state. Take a look at your fence and consider its material, height, and condition. For inspiration, check out 32 garden fence ideas for privacy and style to get an idea of what you can achieve. This will help you determine the best approach to decorating it.

Cleaning the Fence

Beneath the surface, your fence may be hiding dirt and grime. Start by giving it a good clean to create a solid foundation for your plants. Use a pressure washer or a scrub brush to remove any dirt or debris that may be accumulated on the fence.

Adding Support Structures

Preparing your fence for plants may also involve adding support structures such as trellises or arbors. You’ll need to attach these to your fence to provide a framework for your plants to grow on.

Your support structures will play a key role in the overall look and feel of your fence. You can choose from a variety of materials, such as wood or metal, and styles to match your fence and the plants you’ve selected. Make sure to securely attach the structures to your fence to ensure they can support the weight of the plants and any additional decorations you may add.

Planting and Arranging

Despite the variety of plants you can use, choosing the right ones for your fence is key. You’ll want to select plants that thrive in your climate and fit your desired aesthetic.

Planting Vines and Climbers

Above all, you’ll need to provide support for your vines and climbers as you plant them. You’ll be training them to grow up your fence, so make sure it’s sturdy enough to hold their weight.

Arranging Containers and Planters

The next step is to arrange your containers and planters in a way that complements your fence. You’ll want to balance size, color, and texture to create a visually appealing display.

Hence, as you arrange your containers and planters, consider the overall look you want to achieve. You’ll want to create a cohesive design that ties in with your fence and the rest of your outdoor space, so take your time and experiment with different layouts until you find one that works for you.

Maintaining Your Living Fence

Once again, you’ll need to put in some work to keep your living fence looking its best. You’ll want to establish a routine to ensure your plants stay healthy and thrive.

Watering and Irrigation

The key to a lush living fence is proper hydration. You should water your plants regularly, taking care not to overwater, which can lead to root rot and other problems.

Pruning and Grooming

Maintaining a neat and tidy appearance requires regular pruning and grooming. You’ll need to trim back overgrown branches and remove any dead or diseased plants to keep your fence looking its best.

Irrigation systems can be a big help, but you’ll still need to keep an eye on your plants. You’ll want to prune your plants at the right time, usually during the dormant season, to promote healthy growth and prevent damage to your fence.

Adding Decorative Elements

Keep your fence decor simple, yet effective. Add a few statement pieces to elevate your outdoor space. You can use planters, trellises, or other decorative elements to create a unique look.

Using Outdoor Decorations

Across the top of your fence, you can hang outdoor decorations like wind chimes or sculptures to add visual interest. You can also place decorative planters or vases along the fence line to create a beautiful display.

Incorporating Lighting

Above the foliage, string lights or lanterns can be placed to highlight your plants and create ambiance. You can wrap lights around the fence posts or along the top of the fence to create a warm glow.

It is easy to install solar-powered lights, which are a great option for your fence. You can place them along the fence line, and they will charge during the day, providing a soft light at night, making your fence a beautiful focal point in your yard.

Troubleshooting Common Issues

Now that you’ve decorated your fence with plants, you may encounter some problems. You’ll need to identify and fix them to keep your fence looking its best.

Dealing with Pests and Diseases

Along with the beauty of plants comes the risk of pests and diseases. You’ll need to inspect your plants regularly and take action if you notice any issues.

Solving Structural Problems

Issues with your fence’s structure can affect the health of your plants. You’ll need to check your fence for any damage or weaknesses and make repairs as needed.

Due to the weight and moisture of plants, your fence may be more prone to damage. You should regularly inspect your fence posts, boards, and supports to ensure they are secure and sturdy, making any necessary repairs to prevent further damage and keep your plants thriving.

Final Words

Drawing together the threads of this guide, you’ve learned how to decorate your fence with plants. You can now enhance your outdoor space with a touch of green. For more inspiration, visit 30 Decorative Garden Fence Ideas to discover new ways to beautify your fence and make your yard shine, making your outdoor area a reflection of your personal style, with your unique touch.

FAQ

Q: What types of plants are best for decorating a fence?

A: When considering decorating your fence with plants, the options are vast. Climbing plants such as ivy, clematis, and roses are popular choices as they can grow up the fence, covering it beautifully. For a more vibrant look, consider flowering plants like morning glories or sweet peas. If you prefer something less maintenance, succulents and shrubs can add a touch of greenery without requiring frequent watering or pruning.

Q: How do I prepare my fence for planting?

A: Preparing your fence for planting involves a few simple steps. First, ensure your fence is sturdy enough to support the weight of the plants and any additional decorative elements. Next, clean the fence to remove any dirt or debris that might interfere with plant growth. If your fence is made of a material that doesn’t support plant growth directly, such as metal or vinyl, consider attaching a trellis or a planter box to it. Finally, check the fence’s condition and make any necessary repairs before proceeding with the decoration.

Q: What is the best way to attach plants to a fence?

A: Attaching plants to a fence can be done in several ways, depending on the type of plant and fence you have. For climbing plants, you can use a trellis or a mesh screen attached to the fence for them to climb on. For potted plants, hanging baskets or planter boxes can be screwed or nailed into the fence. Make sure the method you choose does not damage the fence and provides adequate support for the plant as it grows.

Q: How often should I water and maintain the plants on my fence?

A: The watering and maintenance schedule for your fence plants depends on the type of plants you’ve chosen. Generally, plants on a fence need regular watering, especially during hot summer months. Check the soil moisture by inserting your finger into the soil up to the first knuckle; if the soil feels dry, it’s time to water. Additionally, fertilize your plants periodically to ensure they receive the necessary nutrients for healthy growth. Pruning is also important to keep the plants looking their best and to encourage new growth.

Q: Can I decorate my fence with plants in shady areas?

A: Yes, you can definitely decorate your fence with plants even in shady areas. Choose plants that thrive in shade, such as ferns, hostas, or astilbe. These plants come in a variety of textures and colors and can add depth and beauty to your fence line. Consider the amount of shade your fence receives and select plants accordingly. Some plants tolerate partial shade, while others prefer full shade. Proper maintenance, including watering and fertilizing, will help keep your shade-loving plants healthy and flourishing.

The Best Tips for Growing Garlic at Home

As you consider growing your own garlic, you’re likely looking for ways to ensure a successful harvest. You can start by learning from experts and experienced gardeners. For a comprehensive guide, you can visit 6 Top Tips for Growing Garlic to get started. By following the right techniques, you’ll be able to grow delicious and healthy garlic in your own home, and enjoy the numerous benefits that come with it, including fresh flavors and improved health.

Key Takeaways:

To achieve success in growing garlic at home, consider the following points:

  • Choose the right variety of garlic for your climate and desired flavor profile, as different types of garlic have varying hardiness levels and maturity dates.
  • Prepare the soil by adding organic matter and ensuring it has good drainage, as garlic prefers well-draining soil with a pH between 6.0 and 7.0.
  • Plant individual cloves 4-6 inches apart and 2-3 inches deep, with the basal plate facing down, to give the garlic roots room to grow and develop properly.

Preparation

While getting started with growing garlic at home, you’ll want to explore resources to ensure you’re doing it right. Check out discussions like Garlic decided it wanted to grow, can I bury it and maybe get some actual garlic? for insights from experienced gardeners.

Choosing the Right Garlic Variety

About the type of garlic you want to grow, you should consider factors like climate, flavor, and storage life to select the best variety for your needs, allowing you to make an informed decision for your garden.

Preparing the Soil

Preparing the soil for garlic involves testing its pH level and adjusting it if necessary, as garlic prefers a slightly acidic to neutral soil pH, and you should also add organic matter like compost to improve soil structure and fertility, which will help your garlic grow strong and healthy, allowing you to achieve a bountiful harvest.

Planting

If you want to grow garlic at home, you’ll need to start by planting individual cloves. This process is relatively straightforward and can be done in the fall or early spring, depending on your climate.

When to Plant Garlic

For optimal growth, you should plant garlic when the weather is cool, as this will help the cloves establish a strong root system before the heat of summer. Typically, this means planting in late summer or early fall, about 6-8 weeks before the first frost.

How to Plant Garlic

Generally, garlic planting involves separating the individual cloves from the bulb and planting them in well-draining soil, with the pointed end facing upwards. You’ll want to space them about 4-6 inches apart, and plant them at a depth of about 2-3 inches.

Understanding the specifics of how to plant garlic is key to a successful harvest. As you prepare to plant, make sure your soil is loose and well-draining, with a pH between 6.0 and 7.0. You should also consider adding compost or well-rotted manure to the soil to provide your garlic with imperative nutrients. By following these steps, you’ll be well on your way to growing healthy, flavorful garlic that you can enjoy for months to come.

Care and Maintenance

Not much is needed to keep your garlic healthy, but regular care will ensure a bountiful harvest. You’ll need to provide your garlic with the right conditions to thrive.

Watering and Mulching

Betwixt the planting and harvesting seasons, you should maintain a consistent moisture level in your soil, and apply a layer of mulch to retain water and suppress weeds, which will help your garlic grow.

Dealing with Pests and Diseases

Along with proper care, you’ll need to watch out for signs of pests and diseases, such as yellowing leaves or black spots, which can damage your garlic crop if left unchecked.

Indeed, dealing with pests and diseases requires swift action, and you should inspect your garlic plants regularly to catch any issues early, treating them with organic or chemical solutions as needed to prevent the problem from spreading and to protect your harvest.

Harvesting

To ensure a successful garlic harvest, you’ll want to check out expert advice, such as How to Grow Garlic Indoors the Right Way, for valuable insights.

Knowing When to Harvest

One of the most important steps in harvesting garlic is determining when the time is right, typically when the tops of the plants begin to yellow and fall over, indicating that the bulbs are ready to be dug up.

How to Harvest and Store Garlic

The process of harvesting and storing garlic requires care, as you’ll need to gently dig up the bulbs, being careful not to damage them, and then dry them in a cool, dry place to preserve for future use.

Hence, you will be able to enjoy your homegrown garlic for months to come, adding flavor to a variety of dishes, from soups to salads, and you can also share your bounty with friends and family, or store it for later use, allowing you to savor the fruits of your labor.

Common Mistakes to Avoid

Unlike other plants, growing garlic requires attention to detail to achieve a successful harvest. You need to be aware of the common pitfalls that can affect your garlic crop, such as overwatering, underwatering, and inadequate sunlight, to ensure your garlic grows healthy and strong.

Overwatering and Underwatering

Any inconsistency in watering can be detrimental to your garlic plants, so you should aim to find a balance that keeps the soil moist but not waterlogged, as this can lead to rot and poor growth.

Not Providing Enough Sunlight

Between planting and harvesting, your garlic needs sufficient sunlight to photosynthesize and grow, so you should choose a location that receives plenty of direct sunlight for most of the day.

Overwatering can be a problem, but not providing enough sunlight can also stunt the growth of your garlic plants, so you should ensure that your garlic receives at least 6 hours of direct sunlight per day, as this will help to promote healthy growth and development, and you will be rewarded with a bountiful harvest.

Tips for Success

After establishing your garlic garden, you’ll want to ensure its success. Consider the following:

  • Choose the right variety
  • Plant at the right time

. Knowing these tips will help you achieve a bountiful harvest.

Rotating Crops

Around the same time, you’ll need to think about rotating your crops to avoid depleting the soil of nutrients. This will help maintain the health of your garlic plants and prevent disease.

Composting and Fertilizing

Often, you’ll find that composting and fertilizing are necessary for promoting healthy growth. You can use natural fertilizers to enrich the soil and support your garlic plants.

Even if you’re new to gardening, you can easily start composting and fertilizing your garlic plants. You can create your own compost using kitchen scraps and yard waste, or purchase organic fertilizers from a gardening store. As you add these nutrients to the soil, you’ll begin to notice improvements in your garlic plants’ growth and flavor, and you’ll be able to enjoy a successful harvest from your home garden.

Summing up

On the whole, you now have the necessary knowledge to grow garlic at home. You can successfully cultivate your own garlic by following the tips outlined, from selecting the right variety to harvesting at the optimal time. With your newfound understanding, you will be able to enjoy your homegrown garlic and appreciate the benefits of having this flavorful ingredient in your kitchen, enhancing your cooking with your own fresh produce.

FAQ

Q: What are the best conditions for growing garlic at home?

A: Garlic prefers well-draining soil and full sun to partial shade. It thrives in areas with rich, fertile soil that has a pH between 6.0 and 7.0. Additionally, garlic needs adequate moisture, especially when the bulbs are forming. Aim to provide about 1 inch of water per week, either through rainfall or irrigation.

Q: How do I prepare the soil for planting garlic?

A: To prepare the soil for planting garlic, start by loosening the soil to a depth of about 12 inches. Then, mix in a 2-inch layer of compost or well-rotted manure to improve soil fertility and drainage. It’s also a good idea to add a balanced fertilizer according to the manufacturer’s instructions. Avoid using fresh manure, as it can burn the garlic’s roots.

Q: When is the best time to plant garlic at home?

A: In most regions, the best time to plant garlic is in the fall, about 6-8 weeks before the first frost. This allows the garlic to establish itself over the winter and produces a larger harvest. If you live in a warmer climate, you can also plant garlic in late winter or early spring, as soon as the soil can be worked. Avoid planting garlic in the summer, as the heat can cause the bulbs to rot.

Q: How do I care for garlic plants as they grow?

A: To care for garlic plants, keep the soil consistently moist during the first few weeks after planting. As the plants grow, you can reduce watering to about 1 inch per week. It’s also crucial to keep the area around the garlic plants weed-free, as weeds can compete for water and nutrients. You can use a layer of mulch to suppress weeds and retain moisture in the soil.

Q: How do I know when my garlic is ready to harvest?

A: Garlic is typically ready to harvest when the tops of the plants begin to yellow and fall over. This usually occurs about 3-4 months after planting, depending on the variety. Check the bulbs by carefully digging around the plant with a fork, being careful not to damage the bulbs. If the bulbs are divided into separate cloves and the necks have started to dry, it’s time to harvest. Use a garden fork to carefully lift the bulbs out of the ground, and then let them dry in a warm, dry place for a few weeks before storing.

Opaye Skip to content