yard

The Best Shrubs for Attracting Birds to Your Yard

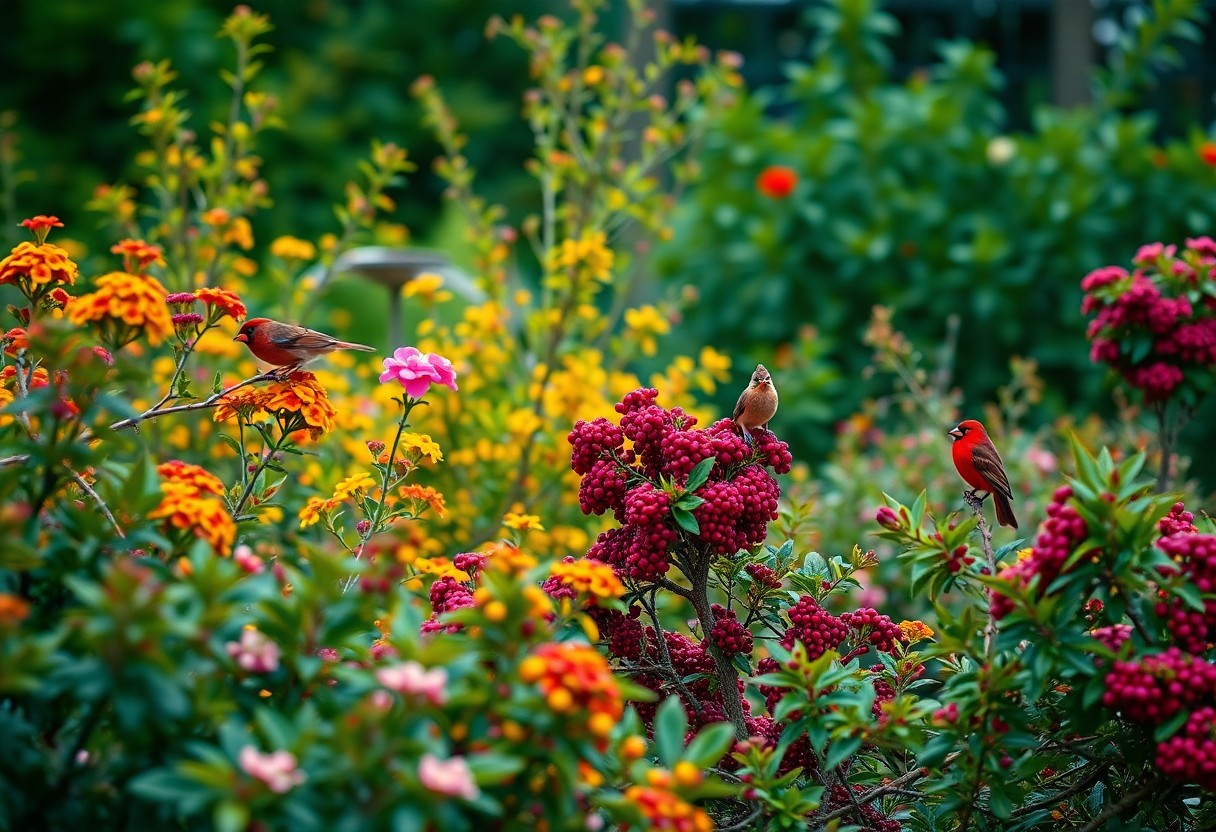
As you strive to create a bird-friendly habitat, you’re likely looking for ways to attract a variety of species to your yard. You can start by selecting the right shrubs, which provide food, shelter, and nesting sites for birds. By choosing the right shrubs, you can transform your outdoor space into a haven for birds, enhancing your viewing experience and supporting local wildlife. You’ll learn which shrubs are best suited for your yard and how they can help attract birds.

Key Takeaways:

To create a bird-friendly yard, consider the following points when selecting shrubs:

  • Plant native shrubs that produce berries or seeds to attract a variety of bird species, as these provide a natural source of food and shelter.
  • Incorporate evergreen shrubs to offer year-round habitat and protection for birds, especially during harsh weather conditions.
  • Choose flowering shrubs that attract insects, which serve as a food source for birds, and consider shrubs with dense foliage to provide nesting sites.

    Choosing the Right Shrubs

    The type of shrub you choose will depend on the climate and region you live in, as well as the type of birds you want to attract. You should consider factors such as the shrub’s growth habits, soil requirements, and the types of food it provides.

    Native Species

    Between the various options available, native species are often the best choice, as they will be most attractive to local bird populations. You can consult with a local nursery or landscaper to determine which native shrubs are best suited to your area.

    Berry-Producing Shrubs

    Above all, berry-producing shrubs are a great option, as they provide a source of food for birds during the winter months. You can choose from a variety of shrubs, such as holly or dogwood, to attract birds to your yard.

    Species such as blueberries, raspberries, and blackberries are excellent choices, as they produce abundant berries that attract a wide range of bird species. You can plant these shrubs in a location that receives full sun to partial shade, and provides well-draining soil, to ensure optimal growth and berry production, and in turn, attract a variety of birds to your yard.

    Shrubs for Different Seasons

    It is crucial to choose shrubs that attract birds throughout the year, as different species visit your yard during various seasons, and you can select shrubs that cater to these seasonal visitors.

    Spring-Blooming Shrubs

    By adding spring-blooming shrubs to your yard, you can provide a source of nectar and insects for birds, such as azaleas and rhododendrons, which are perfect for attracting birds like hummingbirds and orioles.

    Summer-Fruiting Shrubs

    With summer-fruiting shrubs, you can offer juicy fruits for birds, such as dogwoods and hawthorns, which are ideal for attracting birds like robins and blue jays.

    It is worth noting that summer-fruiting shrubs, like dogwoods and hawthorns, provide a perfect source of nutrition for birds during the summer months when they need energy to raise their young, and by incorporating these shrubs into your yard, you can create a bird-friendly habitat that supports their needs.

    Creating a Bird-Friendly Habitat

    Your yard can become a haven for birds by incorporating the right shrubs and plants, providing them with food, shelter, and water, making it an ideal spot for them to thrive.

    Planting Tips

    Along with choosing the right shrubs, you should consider the following:

    • Native plants
    • Diverse foliage

    Thou shalt see an increase in bird activity as you create a welcoming environment.

    Maintenance Advice

    Alongside regular watering and pruning, consider the types of birds you want to attract and tailor your maintenance accordingly, you will be able to enjoy the beauty of nature in your yard.

    Creating a low-maintenance habitat is key to attracting birds, by choosing disease-resistant and hardy shrubs, you will be able to minimize your upkeep while still providing a haven for your feathered friends, allowing you to sit back and enjoy the sights and sounds of nature in your own backyard.

    Popular Shrubs for Bird Attraction

    All bird enthusiasts know that choosing the right shrubs can make a big difference in attracting birds to your yard. You can find a variety of shrubs that can attract birds by visiting Shrubs to Attract Birds and selecting the ones that fit your needs.

    Dogwood and Holly

    Between the various options, Dogwood and Holly are popular choices for attracting birds to your yard, as they provide berries that serve as a food source for many bird species, making your yard a welcoming place for them.

    Viburnum and Juniper

    The selection of Viburnum and Juniper shrubs can also enhance your yard’s attractiveness to birds, offering a mix of berries, seeds, and shelter that cater to different bird species, allowing you to enjoy their beauty and songs.

    Another advantage of Viburnum and Juniper is their low maintenance and adaptability to different environments, making them suitable for your yard regardless of its conditions, and ensuring that you can enjoy the company of birds throughout the year.

    Regional Considerations

    Now, when selecting shrubs to attract birds to your yard, you should consider the specific climate and region you live in. You can find more information on The Best Trees, Vines, and Shrubs to Plant for Birds to help you make informed decisions.

    Shrubs for Cool Climates

    Besides considering the type of birds you want to attract, you should also think about the types of shrubs that thrive in cool climates, such as dogwood or hawthorn, which can provide food and shelter for birds in your area.

    Shrubs for Warm Climates

    Regionally, you will find that different shrubs are more suitable for warm climates, such as Texas sage or lantana, which can attract birds like hummingbirds and orioles to your yard.

    This type of shrub is particularly well-suited for warm climates because it is drought-tolerant and can provide a constant source of nectar for birds, making your yard a welcoming haven for these beautiful creatures, and with the right selection, you can create a bird-friendly habitat that will attract a variety of species to your yard.

    Additional Tips and Tricks

    Despite having the right shrubs, you can further enhance your yard’s appeal to birds. Consider the following:

    • Planting a variety of shrubs
    • Providing nesting boxes

    Recognizing the unique needs of different bird species will help you create a welcoming environment.

    Water Sources and Feeders

    Tactfully, you can attract more birds by installing water sources and feeders, which will provide them with the necessary resources to thrive in your yard.

    Pest Control and Disease Prevention

    Additionally, you should take steps to protect your shrubs and birds from pests and diseases, ensuring a healthy and balanced ecosystem in your yard.

    In addition, you can prevent the spread of disease by keeping your yard clean, removing dead plants, and using organic pest control methods, which will help you maintain a safe haven for your feathered friends, and you will be able to enjoy their beautiful songs and colorful presence in your yard.

    Summing up

    The selection of shrubs you choose can greatly impact the number of birds visiting your yard. By incorporating the best shrubs, you can create a welcoming habitat for various bird species. You will attract a diverse range of birds to your yard, providing them with food and shelter, and enhancing your outdoor experience. With the right shrubs, you can enjoy the beauty and song of birds in your own backyard.

    FAQ

    Q: What types of shrubs are best for attracting birds to my yard?

    A: The best shrubs for attracting birds to your yard are those that provide food, shelter, and nesting sites. Consider planting native shrubs like dogwood, hawthorn, or cedar, which produce berries that birds love to eat. Other options include shrubs with nectar-rich flowers, such as butterfly bush or honeysuckle, which attract birds like hummingbirds and orioles.

    Q: How can I choose the right shrubs for the climate and soil in my area?

    A: To choose the right shrubs for your area, consider the local climate, soil type, and moisture levels. For example, if you live in a dry area, choose drought-tolerant shrubs like juniper or yew. If you have wet soil, consider shrubs like bayberry or elderberry that thrive in moist conditions. Consult with a local nursery or gardening expert to determine the best shrubs for your specific region and soil type.

    Q: What is the best time to plant shrubs to attract birds?

    A: The best time to plant shrubs to attract birds depends on your location and climate. In general, spring and fall are the best times to plant shrubs, as the weather is mild and rainfall is more consistent. Avoid planting in the middle of summer or winter, when extreme temperatures and weather conditions can stress the plants. Additionally, consider planting shrubs that provide year-round interest, such as evergreen shrubs or those with winter berries, to attract birds during different seasons.

    Q: How can I maintain my shrubs to ensure they continue to attract birds?

    A: To maintain your shrubs and keep them attractive to birds, make sure to water them regularly, fertilize them annually, and prune them as needed. Avoid using pesticides, which can harm birds and other wildlife, and instead adopt integrated pest management techniques. Also, consider creating a layered landscape with a mix of shrubs, trees, and perennials, which can provide a diverse range of habitats for birds and other wildlife.

    Q: Can I attract specific types of birds to my yard by planting certain shrubs?

    A: Yes, you can attract specific types of birds to your yard by planting shrubs that provide their preferred food sources or habitats. For example, planting shrubs with blue or black berries, such as blueberries or blackberries, can attract birds like bluebirds and thrushes. Planting shrubs with dense foliage, such as hawthorn or pyracantha, can attract birds like sparrows and finches that need shelter and nesting sites. Research the specific needs and preferences of the bird species you want to attract and choose shrubs accordingly.

How to Transform a Small Yard Into a Beautiful Garden

As you step into your small yard, you envision a serene oasis, a haven that reflects your connection to nature. You desire a space that not only brings you peace but also becomes a vibrant tapestry of colors and textures. With a little creativity and planning, you can transform your compact outdoor area into a stunning garden, teeming with life and beauty, where you can escape the hustle and bustle of daily life and bask in the simplicity of nature’s splendor. You are about to launch on this transformative journey.

Key Takeaways:

To transform a small yard into a beautiful garden, consider the following points:

  • Start by assessing your yard’s space and lighting to determine the best layout and plant selection for your garden.
  • Use vertical gardening techniques, such as trellises or wall-mounted planters, to maximize space and add visual interest to your garden.
  • Choose low-maintenance plants and sustainable gardening practices to create a beautiful and ecological garden that requires minimal upkeep and care.

Transforming Your Outdoor Space

The key to transforming a small yard into a beautiful garden lies in careful planning and attention to detail, allowing you to create a serene oasis that reflects your personal style and connects you with nature.

Assessing Your Yard

These initial steps involve evaluating your yard’s conditions, including sunlight, soil, and existing features, to determine the best approach for your garden design, helping you to envision the potential of your outdoor space.

Identifying Your Goals

For instance, consider what you want to achieve with your garden, whether it’s a peaceful retreat, a space for entertainment, or a vibrant display of flowers and foliage, and let your goals guide your design decisions.

Consequently, as you clarify your objectives, you’ll be able to prioritize your needs and preferences, allowing you to make intentional choices about the layout, plant selection, and features that will bring your vision to life, and enable you to cultivate a garden that nurtures both your body and soul.

Designing Your Garden

There’s no need for a large yard to create a beautiful garden, as even small spaces can be transformed into serene oases. You can turn your small yard into a stunning garden by making a few simple changes.

Choosing the Right Plants

Similarly, selecting plants that thrive in small spaces is important for your garden’s success. You should opt for compact varieties that won’t overgrow your yard, and consider plants that serve multiple purposes, such as herbs or flowers that attract pollinators.

Selecting Garden Features

Consequently, choosing the right features for your garden will enhance its beauty and functionality. You can add a small fountain, a bench, or a statue to create a peaceful atmosphere, and consider vertical elements like trellises or arbors to maximize space.

Hence, as you select garden features, you’ll want to think about how they will work together to create a cohesive and inviting space. You can experiment with different layouts and designs until you find a balance that reflects your personal style and meets your needs, allowing you to fully enjoy your newly transformed garden oasis.

Transforming Your Yard

All it takes is a little creativity and elbow grease to turn your small yard into a serene oasis. You can start by envisioning your ideal garden, considering the natural surroundings and your personal style.

Preparing the Soil

Before you begin planting, you’ll need to assess your soil quality and make any necessary adjustments to create a fertile foundation for your garden. You’ll want to test the pH levels and amend the soil with organic matter to give your plants the best chance to thrive.

Building Garden Structures

Along with choosing the right plants, you’ll also want to consider the physical elements that will bring your garden to life, such as paths, walls, and seating areas. You’ll need to think about the materials and designs that will complement your garden’s natural beauty.

With a clear plan in place, you can start constructing the structures that will enhance your garden’s functionality and aesthetic appeal. You’ll be able to create a cozy nook for relaxation, a meandering path for exploration, or a decorative wall to add visual interest, all tailored to your unique vision and style, allowing you to fully immerse yourself in your newly created outdoor sanctuary.

Transforming Your Yard

Once again, you find yourself yearning for a serene outdoor space, and a small yard can be just as beautiful as a large one, as seen in 20 Small Backyard Ideas for a Dreamy Outdoor Oasis, with a little creativity.

Designing Your Garden Layout

Aften you’ll want to consider the natural flow of your yard when designing your garden layout, taking into account the paths and areas where you’ll be spending most of your time.

Incorporating Outdoor Lighting

Including outdoor lighting can make a significant impact on the ambiance of your garden, allowing you to enjoy it even after the sun sets.

For instance, you can use solar-powered lanterns or string lights to create a warm and inviting atmosphere, highlighting the beauty of your garden and making it a perfect spot to relax and unwind in the evening, surrounded by the sights and sounds of nature that you’ve carefully cultivated in your own backyard oasis, which you can now enjoy with your loved ones.

Transforming Your Space

Your outdoor area, no matter how small, holds great potential for transformation into a serene and beautiful garden, a haven that nurtures both body and soul, inviting you to step into its tranquility.

Adding Decorative Elements

About the aesthetic appeal of your garden, consider adding elements like sculptures, bird baths, or sundials to enhance its beauty and create a personalized ambiance that reflects your connection with nature.

Creating a Focal Point

Beside the pathways and amidst the greenery, a focal point such as a fountain or a statue can draw your eye, creating a sense of depth and beauty, beckoning you to explore and enjoy your outdoor space.

Section by section, as you develop your focal point, you’ll find that it becomes the heart of your garden, a place where you can sit, contemplate, and find peace, surrounded by the harmony of nature that you’ve carefully crafted, making your small yard a true sanctuary, a beautiful reflection of your inner self and your love for the natural world.

Introduction to Small Yard Transformation

Not every homeowner has a large yard, but that doesn’t mean you can’t create a beautiful garden. With a little planning and effort, you can transform your small yard into a serene oasis that brings you joy and peace.

Maintaining Your Garden

Alongside regular upkeep, tending to your garden becomes a meditative experience, allowing you to connect with nature. You’ll find yourself nurturing your plants, watching them grow, and enjoying the simple pleasures of being outdoors.

Troubleshooting Common Issues

After you’ve planted your garden, you may encounter some challenges, such as pests or diseases. You’ll need to monitor your garden’s health and take action when necessary to ensure its continued thrive.

For instance, if you notice that your plants are being eaten by pests, you can introduce natural predators or use organic pest control methods to resolve the issue, allowing your garden to flourish and become a haven for you to enjoy.

Conclusion

As a reminder, you have the power to transform your small yard into a serene oasis. By embracing simplicity and harmony with nature, you can create a beautiful garden that nourishes both body and soul. You will find that your outdoor space, no matter how small, can become a tranquil retreat that brings you joy and peace, allowing you to reconnect with the natural world and yourself.

FAQ

Q: What are the first steps to take when transforming a small yard into a beautiful garden?

A: When transforming a small yard into a beautiful garden, the first steps to take include assessing the space, considering the climate and sunlight patterns, and defining the purpose of the garden. Start by measuring the yard and creating a rough sketch of the area, noting any existing features such as trees, slopes, or patio spaces. Next, observe the yard at different times of day to determine which areas receive full sun, partial shade, or full shade, as this will inform plant selection. Finally, think about how you want to use the garden – will it be for outdoor dining, relaxation, or entertainment – to help guide design decisions.

Q: How can I maximize space in a small yard to create a beautiful garden?

A: To maximize space in a small yard, consider using vertical elements such as trellises, arbors, or living walls to add depth and interest without taking up too much floor space. Additionally, choose compact or dwarf varieties of plants, and use containers or raised beds to define different areas of the garden. Using multi-functional features, such as a bench with built-in storage or a pond with a fountain, can also help to optimize space. Don’t forget to incorporate pathways and walkways to create a sense of flow and guide visitors through the garden.

Q: What types of plants are best suited for a small yard garden?

A: When opting for plants for a small yard garden, look for varieties that are compact, low-maintenance, and suitable for the local climate. Consider using a mix of flowering plants, shrubs, and groundcovers to add texture and visual interest. Some popular choices for small gardens include succulents, herbs, and dwarf fruit trees. Also, choose plants with varying bloom times to ensure year-round color and interest. Be sure to select plants that are proportional to the size of the garden, and don’t be afraid to use plants with different growth habits, such as upright or trailing, to add depth and variety.

Q: How can I incorporate hardscaping elements into my small yard garden design?

A: Hardscaping elements, such as patios, walkways, and walls, can help define different areas of the garden and create a sense of structure. In a small yard, it’s best to keep hardscaping elements simple and unobtrusive, using materials such as brick, stone, or gravel that complement the surrounding landscape. Consider using a small patio or seating area to create a focal point, and use walkways to guide visitors through the garden. You can also use retaining walls or raised beds to create separate areas for different types of plants or features, such as a vegetable garden or water feature.

Q: What are some tips for maintaining a small yard garden over time?

A: To maintain a small yard garden, establish a regular routine that includes tasks such as watering, pruning, and fertilizing. Keep the garden well-weeded, and mulch or compost to retain moisture and suppress weeds. Regularly inspect the garden for signs of pests or disease, and take action promptly to prevent problems from spreading. Don’t forget to enjoy the garden and make adjustments as needed – a small garden can be a dynamic and evolving space that changes with the seasons, and it’s okay to try new things and make mistakes. By staying on top of maintenance and making adjustments as needed, you can keep your small yard garden looking its best all year round.

The Benefits of Using Permeable Paving in Your Yard

As you consider the design of your yard, you may want to explore the option of permeable paving, a choice that allows rainwater to filter through the surface, reducing runoff and promoting a healthier environment. By incorporating this eco-friendly feature, you can create a more sustainable outdoor space. To learn more about the advantages of this approach, visit A Greener Choice: Advantages of Permeable Paving and discover how your yard can benefit from this innovative technique.

Key Takeaways:

To get the most out of your yard, consider the advantages of incorporating permeable paving into your design. Here are a few points to consider:

  • Using permeable pavers allows for better water absorption, reducing stormwater runoff and the potential for erosion in your yard.
  • Permeable paving materials, such as porous concrete or gravel, promote healthy drainage and can help to recharge groundwater levels, supporting local ecosystems.
  • Incorporating permeable pavers into your yard design can also help to reduce urban heat island effects by allowing water to penetrate the surface, keeping the area cooler and more comfortable during warm weather.

Environmental Advantages

A key aspect of permeable paving is its ability to harmonize with nature, allowing your yard to blend seamlessly into the surrounding environment, creating a more natural balance and reducing the impact of human activity on the land.

Reduced Stormwater Runoff

About the time you start noticing the effects of heavy rainfall, you’ll appreciate the benefits of permeable paving, as it allows rainwater to percolate through the surface, reducing stormwater runoff and alleviating pressure on your local drainage system.

Improved Water Quality

Any effort you make to reduce stormwater runoff will also contribute to improved water quality, as permeable paving helps to filter out pollutants and sediments, allowing cleaner water to flow into your local waterways, benefiting both your yard and the environment.

Runoff from traditional paving can carry pollutants and sediments into nearby waterways, but with permeable paving, you can rest assured that your yard is playing a role in maintaining the health of your local ecosystem, as the water that flows through the paving is filtered and cleansed, helping to preserve the natural balance of your environment, and allowing you to enjoy a clearer conscience, knowing your yard is a part of the solution, not the problem.

Economic Benefits

Assuming you’re looking to make a smart investment in your yard, permeable paving can offer significant economic benefits. By reducing stormwater management costs, you can save money in the long run. For more information on the benefits of permeable pavers, visit The Environmental Benefits of Permeable Pavers to learn more.

Lower Maintenance Costs

Betwixt the initial installation and long-term upkeep, you’ll find that permeable paving requires less maintenance than traditional paving methods, saving you time and money on repairs and replacements.

Increased Property Value

Behind the aesthetic appeal of permeable paving lies a significant increase in your property’s value, as eco-friendly features become increasingly desirable to homebuyers and environmentally conscious individuals.

A key aspect of increased property value is the potential for higher resale value, as your yard becomes a unique selling point, showcasing your commitment to sustainability and environmental stewardship, which can be a major draw for like-minded buyers, allowing you to reap the rewards of your investment in permeable paving.

Aesthetic Appeal

Once again, you’ll find that permeable paving enhances your yard’s beauty, allowing you to create a unique outdoor space that showcases your personal style. The natural look and feel of permeable pavers blend seamlessly with your surroundings, creating a harmonious balance between nature and design.

Variety of Designs and Materials

Beneath the surface of traditional paving lies a world of limitations, but with permeable paving, you have a wealth of design options and materials to choose from, enabling you to customize your outdoor space to suit your tastes and preferences.

Enhanced Curb Appeal

Various features of permeable paving can boost your yard’s curb appeal, from the attractive appearance of the pavers themselves to the vibrant plant life that thrives in the spaces between them, all combining to create a visually stunning exterior that invites you to linger and appreciate its beauty.

With the added benefit of enhanced curb appeal, you can take pride in your yard’s appearance, knowing that it not only looks beautiful but also supports the local ecosystem and manages stormwater runoff effectively, making your outdoor space a true oasis that nourishes both you and the environment.

Functional Benefits

For a more sustainable and environmentally friendly yard, permeable paving offers numerous advantages. You can enjoy a reduction in stormwater runoff, minimizing the burden on your local drainage systems, and creating a more balanced ecosystem in your yard.

Improved Drainage and Reduced Flooding

On occasion, heavy rainfall can overwhelm traditional paving, leading to flooding and erosion. With permeable paving, you can mitigate this issue, allowing rainwater to percolate through the surface, reducing the likelihood of flooding and creating a more stable outdoor space.

Increased Safety and Accessibility

Above all, permeable paving provides a slip-resistant surface, reducing the risk of accidents and injuries, making it an excellent choice for families with children or pets, and allowing you to enjoy your outdoor space with greater peace of mind.

Hence, as you consider the benefits of permeable paving, you’ll find that it not only enhances the aesthetic appeal of your yard but also provides a safer and more accessible environment for you and your loved ones to enjoy, allowing you to connect with nature and appreciate the simple pleasures of life.

Types of Permeable Paving

Many options are available for your yard, including:

  • Porous Asphalt
  • Permeable Interlocking Concrete Pavement

This information is broken down into the following table:

Type Description
Porous Asphalt Allows water to percolate
Permeable Interlocking Concrete Pavement Reduces stormwater runoff
Grass Pavers Combines pavement and grass
Permeable Pavers Filters rainwater
Concrete Grid Pavers Increases drainage

Porous Asphalt

For a more eco-friendly option, consider porous asphalt, which enables water to drain through the surface, reducing the amount of stormwater that enters your local waterways, allowing you to contribute to a healthier environment.

Permeable Interlocking Concrete Pavement

After selecting the type of pavers, you can enjoy the benefits of permeable interlocking concrete pavement, which reduces stormwater runoff and allows water to filter through the pavement, recharging groundwater and reducing the burden on your local drainage systems.

Hence, as you consider permeable interlocking concrete pavement for your yard, you’ll notice that it not only reduces stormwater runoff but also provides a durable and low-maintenance surface, allowing you to enjoy your outdoor space while also doing your part for the environment, and thereby creating a harmonious balance between your yard and nature.

Installation and Maintenance

Now that you’ve decided to incorporate permeable paving into your yard, it’s vital to consider the installation and maintenance process. You’ll want to ensure that your paving is properly installed to reap its benefits and maintain its effectiveness over time.

Proper Installation Techniques

Beneath the surface of a successful permeable paving system lies a well-designed and executed installation plan. You’ll need to choose the right materials and follow the manufacturer’s instructions to ensure a seamless integration with your yard’s ecosystem.

Regular Maintenance and Repair

Amidst the beauty of your newly installed permeable paving, you’ll need to stay on top of regular maintenance and repair tasks. You should inspect your paving regularly to identify any issues that may arise, such as clogging or settling, and address them promptly to maintain its effectiveness.

Considering the long-term benefits of permeable paving, it’s worth investing time in regular maintenance and repair. You’ll find that your paving requires less upkeep than traditional impervious surfaces, and with the right techniques, you can enjoy a beautiful, functional, and eco-friendly outdoor space that blends seamlessly into your surrounding landscape, allowing you to live in harmony with nature, just as you intended when you chose to incorporate permeable paving into your yard.

Summing up

The decision to use permeable paving in your yard can have a profound impact on the environment and your own well-being. As you consider this option, you’ll find that it allows rainwater to seep into the ground, reducing runoff and filtering out pollutants, ultimately benefiting your surrounding ecosystem and your own little corner of the world, making your yard a haven that harmonizes with nature. You will enjoy the beauty and tranquility it brings to your outdoor space.

FAQ

Q: What are the environmental benefits of using permeable paving in my yard?

A: Permeable paving allows rainwater to percolate through the surface, reducing stormwater runoff and filtering out pollutants and sediments. This helps to protect local waterways and maintain healthy groundwater levels. Additionally, permeable pavers can reduce the urban heat island effect, as they allow water to evaporate and cool the surrounding area, creating a more sustainable and eco-friendly outdoor space.

Q: How does permeable paving help with drainage and flooding in my yard?

A: Permeable paving is designed to allow water to pass through the surface, reducing the amount of stormwater runoff and alleviating pressure on drainage systems. This helps to prevent flooding, erosion, and water damage to your yard and surrounding properties. By allowing water to infiltrate the ground, permeable pavers also help to recharge groundwater aquifers, reducing the risk of drought and water scarcity.

Q: Can permeable paving be used for driveways and high-traffic areas?

A: Yes, permeable paving can be used for driveways and high-traffic areas, but it’s vital to choose a suitable material and design. Porous asphalt, permeable concrete, and permeable interlocking concrete pavers are popular options for driveways and high-traffic areas. These materials are designed to withstand heavy loads and frequent use while still allowing water to percolate through the surface. However, it’s crucial to consult with a professional to determine the best material and design for your specific needs.

Q: How do I maintain and clean permeable paving in my yard?

A: Maintaining permeable paving is relatively easy. Regular sweeping and clearing of debris can help prevent clogging and maintain the paving’s permeability. Depending on the material, you may need to perform occasional vacuuming or pressure washing to remove dirt and sediment. It’s also vital to inspect your permeable paving regularly to ensure it’s functioning correctly and make any necessary repairs to prevent damage and extend its lifespan.

Q: Are there any cost benefits to using permeable paving in my yard?

A: Yes, permeable paving can offer several cost benefits. By reducing stormwater runoff, you may be eligible for stormwater management credits or discounts on your water bills. Additionally, permeable paving can help extend the lifespan of your yard’s drainage system, reducing the need for costly repairs and replacements. While the initial installation cost of permeable paving may be higher than traditional paving materials, its long-term benefits and potential cost savings can make it a worthwhile investment for your outdoor space.

How to Build a DIY Arbor for Your Yard

You stand in your yard, envisioning a entrance that’s more than just a gate. You want a statement piece, something that sets the tone for your outdoor space. Building a DIY arbor is within your reach. With basic tools and materials, you can create a beautiful structure that adds shade, beauty, and functionality to your yard. You’ll take pride in your handiwork as you shape your outdoor space into a haven.

Key Takeaways:

To build a DIY arbor for your yard, consider the following points:

  • Start by planning and designing your arbor structure, taking into account the space available and the style you want to achieve, and make sure to choose the right materials for the job.
  • Prepare your site by clearing the area and laying a foundation to ensure stability, and then begin constructing the arbor frame using posts and beams.
  • Finally, add the roofing and decorative elements, such as vines or flowers, to complete your DIY arbor and create a beautiful and functional outdoor space.

Planning Your Arbor

The first step in building a DIY arbor is planning. You can find inspiration and guidance on How to Build a Wood Arbor for Garden or Yard projects online.

Determining the purpose of your arbor

Around your yard, you’ll want to consider how you plan to use your arbor. You’ll need to think about the space where it will go and what you want to achieve with it.

Choosing the right materials

Among the many options for building an arbor, you’ll need to select materials that fit your style and budget. You’ll consider wood, metal, or vinyl, each with its own pros and cons.

Hence, when selecting materials, you should think about durability, maintenance, and aesthetics. You’ll want your arbor to withstand the elements and look good doing it, so choose materials that are weather-resistant and visually appealing, such as cedar or redwood for a natural look, or metal for a sleek, modern feel.

Designing Your Arbor

Even a simple arbor can be a beautiful addition to your yard. You’ll need to consider size, style, and materials when designing your arbor.

Selecting a style and design

Arbors come in many styles, from classic to modern. You can choose a design that complements your home and yard, considering factors like space and purpose.

Measuring and marking the area

Marking the area where you’ll build your arbor is the first step. You’ll need to decide on the arbor’s size and location, taking into account the space available and the surrounding landscape.

Your measurements will determine the overall shape and structure of your arbor. You’ll want to consider the width, height, and depth of the space, as well as any obstacles or features that may impact the build. Take your time to ensure accurate measurements, and use stakes and string to mark out the area where your arbor will stand.

Preparing the Site

Unlike other projects, building a DIY arbor requires careful site preparation. You’ll need to assess your yard, considering factors like sunlight, wind direction, and soil quality.

Clearing the area and preparing the ground

Against the backdrop of your yard’s unique conditions, you’ll clear the area of debris and vegetation, creating a clean slate for your arbor. You’ll dig and level the ground, ensuring a stable base.

Laying the foundation

Site selection is key when laying the foundation. You’ll mark out the area, taking care to ensure it’s square and level, then dig holes for the posts.

Preparing the foundation is where your arbor begins to take shape. You’ll set the posts in concrete, making sure they’re secure and evenly spaced, providing a solid base for your DIY arbor to stand the test of time and weather. You’ll fill the holes, tamping down the soil to prevent settling, and let the concrete set before proceeding.

Building the Arbor

Not every yard has an arbor, but yours can. You’ll start by gathering your materials and tools, then begin constructing the frame and posts.

Constructing the frame and posts

Around the perimeter of your yard, you’ll place the posts, making sure they’re level and secure. You’ll then attach the frame, creating the base of your arbor.

Adding the roof and decorations

Across the top of your arbor, you’ll add the roof, providing shade and shelter. You’ll also add any decorations, such as vines or flowers, to give your arbor a personal touch.

For instance, you can add a trellis to the sides of your arbor, allowing plants to climb up and around it. You can also hang wind chimes or lanterns from the roof, creating a peaceful and inviting atmosphere in your yard. As you work, you’ll see your arbor take shape, becoming a beautiful addition to your outdoor space.

Adding Finishing Touches

All that’s left to do is put the final touches on your DIY arbor. You’ve built the structure, now it’s time to make it look polished.

Installing any additional features

By this point, you’ve likely thought about what features you want to add, such as benches or planters. You can now install these features to enhance your arbor’s functionality and aesthetic.

Final inspection and completion

Additional details like paint or stain can be applied to protect your arbor from the elements. You can also add decorative elements to give it a personal touch.

Even after you’ve completed the final inspection, you may find yourself making small adjustments to get everything just right. You’ll want to make sure your arbor is sturdy and level, and that all the features you’ve added are secure. Take your time, and don’t hesitate to make any necessary tweaks to ensure your DIY arbor turns out exactly as you envisioned.

Maintenance and Upkeep

Many factors can affect the longevity of your arbor, including weather conditions and usage. You’ll need to stay on top of maintenance to keep it looking its best.

Regular cleaning and inspections

Around the same time each year, you should inspect your arbor for damage and clean it thoroughly to prevent decay and damage.

Making repairs and replacements

On occasion, you’ll need to make repairs or replace worn-out parts to keep your arbor stable and secure.

Due to the exposure to the elements, your arbor’s components may deteriorate over time, so you should have a plan in place for making repairs and replacements as needed, ensuring your arbor remains a beautiful and functional part of your yard. You can replace rotting wood, tighten loose screws, and apply a fresh coat of sealant to keep your arbor in good condition.

Summing up

Upon reflecting on the process, you’ve got the basics to build a DIY arbor for your yard. You’ve planned, gathered materials, and constructed a simple structure to enhance your outdoor space. Your arbor is now a haven, providing shade and a touch of elegance to your yard. You can step back, admire your handiwork, and enjoy the fruits of your labor.

FAQ

Q: What materials do I need to build a DIY arbor for my yard?

A: To build a DIY arbor, you will need several materials, including lumber for the frame, such as 2x4s or 2x6s, wood screws, a drill, a saw, weather-resistant wood glue, and a waterproof sealant. You may also want to add decorative elements like lattice panels, vines, or flowers. Additionally, consider using pressure-treated wood or naturally rot-resistant woods like cedar or redwood to ensure the longevity of your arbor.

Q: What tools do I need to have to start building my DIY arbor?

A: The basic tools you will need to build a DIY arbor include a circular saw or hand saw for cutting lumber, a drill for screws, a hammer for tapping pieces into place, a tape measure for ensuring accurate cuts and assembly, and a level to guarantee the arbor is perfectly upright. Having a pencil and safety glasses can also be helpful for marking cuts and protecting your eyes from debris.

Q: How do I prepare the site for my DIY arbor in my yard?

A: Before building your DIY arbor, you need to prepare the site. Start by choosing a flat area of your yard that is away from any power lines or other obstructions. Clear the area of any debris, vegetation, or obstructions. If necessary, level the ground to ensure it is even. Mark out the dimensions of your arbor using stakes and string to visualize the space it will occupy. Finally, check with your local government for any building codes or regulations you must comply with.

Q: What design considerations should I keep in mind when building my DIY arbor?

A: When designing your DIY arbor, consider the style and aesthetic you want to achieve. Think about the size, shape, and the type of roofing or topping you want, such as a flat top, a pitched roof, or a pergola-style open top. Also, consider the type of plants or vines you plan to use to adorn your arbor, and whether you want to include features like benches or lighting. Ensuring the design complements your yard and home’s architecture is also important for an integrated look.

Q: How do I ensure my DIY arbor is stable and durable over time?

A: To ensure your DIY arbor is stable and durable, make sure to anchor it well to the ground using concrete footings or deep-set posts to prevent it from toppling over in the wind. Use weather-resistant materials and finishes to protect it from rain and sunlight. Regularly inspect your arbor for signs of wear or damage and perform repairs promptly. Applying a waterproof sealant to the wood and using rust-resistant screws and nails can also help extend the life of your arbor.

How to Use Climbing Roses to Enhance Your Yard

FAQ

Q: What are climbing roses and how can they enhance my yard?

A: Climbing roses are a type of rose bush that can grow upwards using a trellis or other support, adding a beautiful and elegant touch to your yard. They come in a variety of colors and can be used to cover walls, fences, or arbors, providing a stunning display of flowers and foliage. With proper care, climbing roses can thrive and become a focal point in your yard, attracting bees, butterflies, and other pollinators, and adding value to your property.

Q: How do I choose the right climbing rose for my yard?

A: When opting for a climbing rose, consider the amount of sunlight your yard receives, the soil type, and the color scheme you want to achieve. Look for disease-resistant varieties and consider the mature size of the plant to ensure it will fit your space. You should also think about the level of maintenance you are willing to commit to, as some climbing roses require more pruning and care than others. Consult with a gardening expert or check the plant label for specific growing conditions and requirements.

Q: How do I plant and train my climbing rose to grow upwards?

A: To plant a climbing rose, dig a hole that is twice as wide and just as deep as the root ball, and add organic matter like compost or manure to improve soil fertility. Gently remove the rose from its container and place it in the hole, backfilling with soil and watering well. To train your climbing rose to grow upwards, provide a sturdy trellis or support, and gently tie the stems to the support using twine or tape. As the plant grows, continue to prune and train the stems to encourage vertical growth and promote blooming.

Q: How much maintenance do climbing roses require to keep them healthy and thriving?

A: Climbing roses require regular maintenance to keep them healthy and thriving. This includes watering deeply once or twice a week, depending on weather conditions, and fertilizing in the spring with a balanced fertilizer. Prune your climbing rose in late winter or early spring to remove dead, diseased, or damaged wood, and to promote new growth and blooming. Regularly inspect your plant for signs of pests or diseases, and take action promptly if you notice any issues. Mulch around the base of the plant to retain moisture and suppress weeds.

Q: Can I grow climbing roses in containers or do they need to be planted in the ground?

A: While climbing roses typically thrive when planted in the ground, they can also be grown in large containers with good drainage. Choose a container that is at least 12-18 inches deep and has a wide enough mouth to accommodate the mature size of the plant. Use a well-draining potting mix and a large enough trellis or support to accommodate the plant’s growth. Keep in mind that container-grown climbing roses may require more frequent watering and fertilization, as the soil can dry out quickly. With proper care, container-grown climbing roses can thrive and provide a beautiful display of flowers and foliage.

Opaye Skip to content