Home and Garden

Top Tips for Organizing Your Closet Efficiently

As you launch on the journey to optimize your closet space, you’ll find that a well-organized closet can greatly impact your daily routine. You can start by assessing your closet’s current state and identifying areas for improvement. For a comprehensive guide, you can visit How to Organize Your Closet in 6 Easy Steps to get expert advice. By implementing effective strategies, you’ll be able to maximize your closet’s potential and make the most of your space.
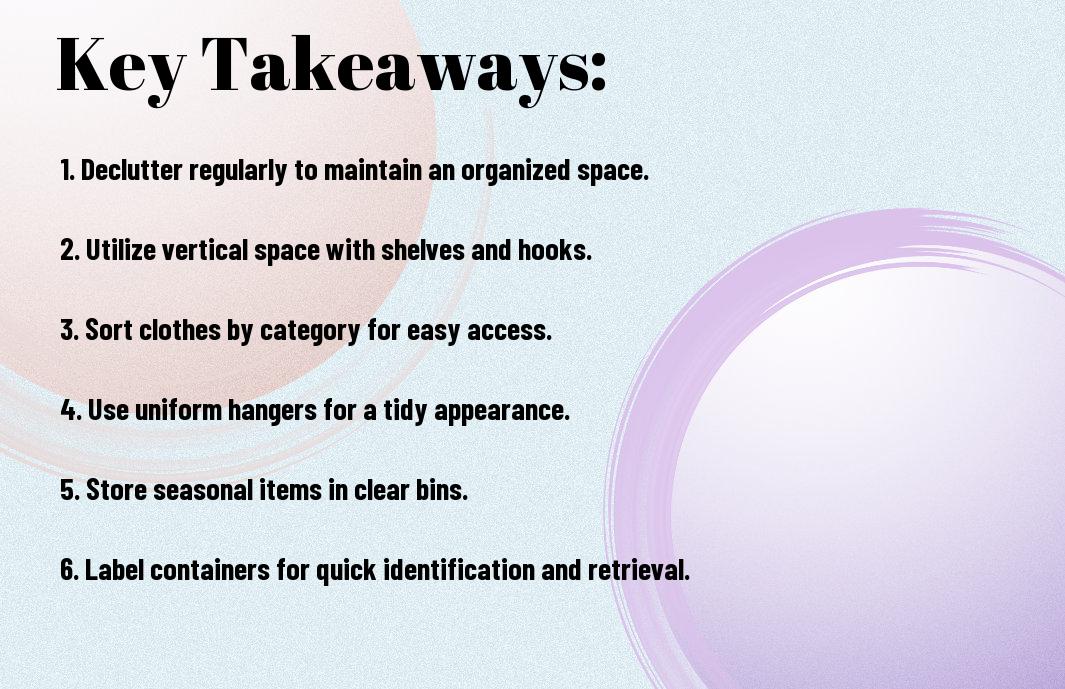
Key Takeaways:

To achieve a well-organized closet, consider the following points:

  • Start by Purging your closet to get rid of items that are no longer needed or useful, and then Categorize the remaining items into groups to make them easier to find and access.
  • Use Storage solutions such as shelves, drawers, and bins to maximize your closet’s Space and keep items off the floor, making it easier to navigate and maintain.
  • Implement a Maintenance routine to keep your closet organized over time, including regular Cleaning and Reorganizing to ensure that your closet remains a functional and Efficient space.

Purging Your Closet

While organizing your closet, it’s vital to get rid of items you no longer need or use. This step will help you declutter and free up space for the items that are truly important to you. Start by taking everything out of your closet and sorting items into categories, making it easier to decide what to keep and what to discard.

Identifying Unnecessary Items

Besides the items that are visibly worn out or damaged, consider getting rid of clothes that no longer fit or suit your style. You should also let go of duplicates, outdated items, and anything that hasn’t been used in the past year.

Decision Making for Donation or Disposal

Only one option is viable for items that are beyond repair: disposal. However, items that are still in good condition can be donated or recycled, giving them a new life and reducing waste.

Identifying the condition and potential usefulness of each item will help you make informed decisions about what to do with it. You can donate gently used clothes to local charities or thrift stores, and consider recycling or upcycling items that are still in good condition but no longer suitable for your closet. By doing so, you’ll not only declutter your space but also contribute to a more sustainable lifestyle, making the most out of your purging process.

Categorization and Grouping

If you want to maximize your closet’s potential, consider exploring 50 Genius Closet Organization Ideas to Make Your Life Easier to get started. You’ll find that categorizing and grouping similar items together makes a significant difference in maintaining a tidy space.

Sorting Similar Items Together

Beneath the surface of a cluttered closet lies an opportunity to sort similar items together, making it easier for you to find what you need. You can group clothes, shoes, and accessories by type, color, or season to create a system that works for you.

Utilizing Categories for Easy Access

For your closet to be truly organized, you need to utilize categories that make sense for your lifestyle. You can categorize items into sections like work clothes, formal wear, or everyday attire, allowing you to quickly access what you need when you need it.

But as you start to categorize and group your belongings, you’ll notice that your closet becomes more functional and efficient. You’ll be able to see everything at a glance, making it easier to plan outfits, prevent clutter from building up, and maintain your newly organized space. As you customize your categories to fit your personal style and needs, you’ll find that getting dressed and ready becomes a much smoother process, saving you time and reducing stress in the long run.
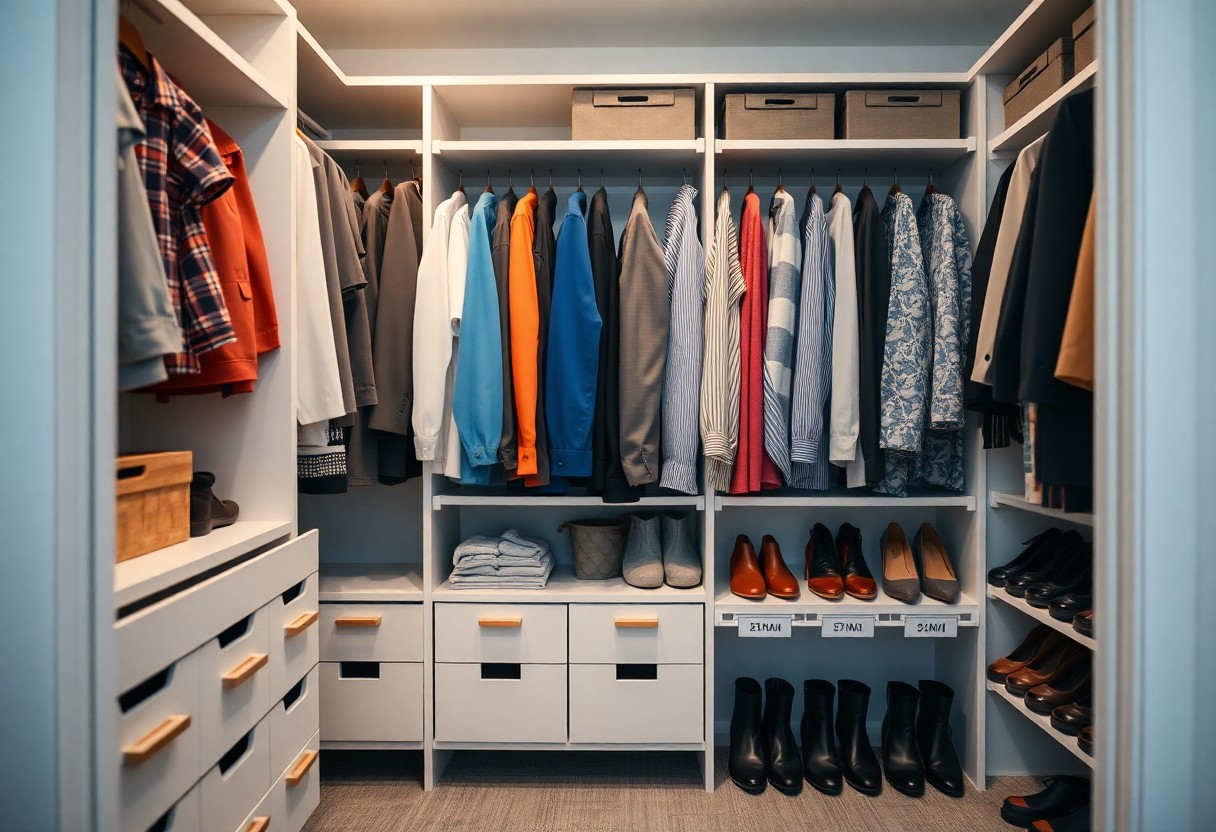
Storage Solutions

Many storage solutions are available to help you organize your closet efficiently. You can choose from a variety of options, such as shelves, drawers, and cubbies, to store your clothes, shoes, and accessories.

Maximizing Shelf Space

Spreading out your belongings on shelves can help you make the most of your closet space. You can use dividers or bins to keep items organized and easy to find, making your closet feel more spacious and clutter-free.

Utilizing Vertical Space

At the top of your closet, you can install shelves or storage units to keep less frequently used items. You can also use stackable bins or baskets to store items like out-of-season clothes or bedding.

Considering the vertical space in your closet, you can install double rods or shelves to double your storage capacity. You can also use wall-mounted hooks, baskets, or shelves to store items like hats, bags, or accessories, keeping them organized and within your reach, making the most of your closet’s potential.

Maintenance and Upkeep

Your closet organization system will only be effective if you maintain it regularly, this involves setting aside time to ensure everything is in its place and making adjustments as needed to keep your space organized and clutter-free.

Scheduling Regular Clean-outs

The key to maintaining your closet’s organization is to schedule regular clean-outs, this will help you get rid of items you no longer need or use, and prevent clutter from building up again, you can set a reminder to do this every few months.

Implementing Habits for Organization

At the end of each day, take a few minutes to put away items you’ve used, this will help you develop habits that will keep your closet organized, you can also make it a habit to hang up your clothes as soon as they come out of the dryer.

Due to the fact that maintaining organization is an ongoing process, you will need to consistently practice these habits to keep your closet clutter-free, as you continue to implement these habits, you will find that it becomes second nature to put things back in their place, and your closet will remain organized and efficient, allowing you to easily find what you need when you need it.

Customization for Efficiency

After assessing your closet’s layout and contents, you can begin customizing the space to maximize efficiency, ensuring that every item has its designated place, making the most of your closet’s potential.

Tailoring Storage to Your Needs

At this stage, you will need to evaluate the types of items you store in your closet and allocate space accordingly, using shelves, drawers, or rods that fit your specific requirements, allowing you to optimize your storage capacity.

Incorporating Personal Touches

On the other hand, adding personal touches can make your closet feel more inviting, you can add lighting, mirrors, or a bench to create a functional and comfortable space that reflects your style and makes getting ready easier.

But as you incorporate personal touches, consider how they will impact the overall functionality of your closet, ensuring that decorative elements do not compromise your ability to efficiently store and access your belongings, and that your closet remains a practical and enjoyable space for you to use daily.

Utilizing Technology and Tools

Not all closet organization systems are created equal, and technology can play a significant role in maximizing your space. You can leverage various tools and apps to streamline your closet organization process, making it more efficient and effective.

Closet Organization Apps

By utilizing closet organization apps, you can create a digital inventory of your belongings, track what you have, and plan your outfit in advance. You can find apps that cater to your specific needs, helping you stay organized and focused on your goals.

Essential Tools for Maintenance

Between keeping your closet clutter-free and maintaining its organization, you will need some crucial tools. You should consider investing in a label maker, shelves, and storage bins to keep your belongings organized and easily accessible.

Indeed, having the right tools for maintenance is vital to keeping your closet organized. You will find that using a label maker helps you quickly identify what’s inside your storage bins, while shelves provide additional storage space for your belongings, keeping them off the floor and out of the way. By using these tools, you can ensure your closet remains organized and clutter-free, making your daily routine easier and more efficient.

Summing up

Upon reflecting on the top tips for organizing your closet efficiently, you will find that your space has been transformed into a functional area. You can now easily locate your belongings, and your morning routine becomes more streamlined. By implementing these tips, you have maximized your closet’s potential, making the most of your storage space and creating a more organized you. Your newly organized closet will save you time and effort in the long run, allowing you to focus on more important things.

FAQ

Q: What are the benefits of organizing my closet?

A: Organizing your closet can bring numerous benefits, including saving time in the morning, reducing stress, and making the most of your space. A well-organized closet helps you quickly find what you need, prevents clutter from building up, and can even help you make the most of your belongings by seeing what you have at a glance. It also contributes to a more peaceful and organized living environment.

Q: How do I start organizing my closet from scratch?

A: To start organizing your closet from scratch, begin by taking everything out of your closet. This will give you a good view of what you have. Then, categorize your items into groups (e.g., shirts, pants, dresses, etc.). Next, purge items that no longer fit, are in poor condition, or haven’t been used in the past year. After deciding what to keep, donate, or discard, start putting back only the items you’ve decided to keep, using storage solutions like shelves, drawers, and bins to maximize your space and keep your closet organized.

Q: What are some efficient storage solutions for a small closet?

A: For small closets, utilizing vertical space is key. Consider installing shelves, double rods, or stackable drawers to maximize your closet’s height. Additionally, use hanging organizers like shoe bags, double hangers, and hanging shelves to optimize your closet’s hanging space. Bins, baskets, and under-shelf storage can also help keep items off the floor and out of the way, making your closet feel larger and more organized.

Q: How can I maintain my newly organized closet over time?

A: To keep your closet organized, establish a routine of regular maintenance. Allocate a few minutes each week to tidying up your closet, putting back items that are out of place, and ensuring everything is in its designated space. It’s also helpful to set a rule for yourself, such as the “one in, one out” policy, where you get rid of an old item each time you bring a new one into your closet. This helps prevent clutter from building up again over time.

Q: Are there any organizational tools that can help maximize closet space?

A: Yes, there are many organizational tools designed to help maximize closet space. Some popular options include closet organizers systems that can be customized to fit your closet’s dimensions and your specific needs. These systems often include components like shelves, drawers, and rods that can be adjusted or added as needed. Additionally, accessories like shoe racks, tie racks, belt racks, and stackable boxes can help keep your closet organized and make the most of your space. Investing in a few of these tools can significantly improve the functionality and spaciousness of your closet.

How to Install a Drip Irrigation System

You’re about to take control of your water usage and give your plants the exact amount of moisture they need. Installing a drip irrigation system is a straightforward process that you can tackle yourself. You’ll start by assessing your yard’s layout and determining the best placement for your system. Your goal is to deliver water directly to the roots of your plants, reducing waste and runoff. With the right materials and a bit of planning, you’ll be able to set up a efficient system that works for you.

Key Takeaways:

To ensure a successful installation of a drip irrigation system, consider the following points:

  • Plan the layout of your drip irrigation system carefully, taking into account the size of your garden or lawn, the type of plants you are watering, and the water pressure available.
  • Choose the right components, including tubing, emitters, and filters, to ensure a efficient and leak-free system.
  • Follow proper installation techniques, such as burying tubing at the correct depth and spacing emitters appropriately, to achieve optimal water distribution and conservation.

    Planning

    For a successful drip irrigation system, you need to consider your garden’s layout and water requirements. You’ll want to assess your space, noting the types of plants, soil, and climate. This will help you determine the best approach for your system.

    Assessing the garden’s water needs

    Wetting your plants’ roots consistently is key. You’ll need to evaluate your garden’s water usage, taking into account the type of plants, soil, and climate. This will help you determine the right irrigation schedule.

    Choosing the right drip irrigation system

    Around your garden, you’ll find various drip irrigation systems. You’ll want to select one that fits your specific needs, considering factors like water pressure and flow rate.

    Indeed, choosing the right drip irrigation system can be overwhelming with all the options available. You’ll need to consider the size of your garden, the type of plants you’re watering, and the local water regulations. By taking the time to evaluate these factors, you can select a system that will efficiently water your plants, saving you time and water in the long run.

    Materials

    Assuming you’re ready to start, you’ll need to gather the necessary materials. You can find a comprehensive list and guide on How to Install Drip Irrigation systems.

    Pipes and fittings

    For your drip irrigation system, you’ll need pipes and fittings that fit your landscape’s specific needs, taking into account the size of your garden or yard.

    Emitters and filters

    Emitters are key components, as they deliver water directly to your plants. You’ll need to choose the right type and size for your system.

    To set up your emitters and filters, you’ll need to consider the water pressure and flow rate, ensuring that your plants get the right amount of moisture. You’ll find that the right combination of emitters and filters will help you achieve a efficient irrigation system, tailored to your specific needs, allowing you to water your plants effectively.

    Preparation

    Now that you’ve decided to install a drip irrigation system, it’s time to get started. You’ll need to assess your garden, taking note of its size, shape, and water requirements.

    Measuring and marking the garden

    Marking out the boundaries of your garden is the first step. You’ll be identifying areas that need irrigation, taking into account the type of plants and their specific needs.

    Digging and laying pipes

    Along with your measurements, you’ll begin digging shallow trenches for the pipes, making sure they’re level and evenly spaced to ensure proper water distribution.

    To lay the pipes, you’ll need to connect them to the water source and then distribute them throughout the garden, securing them in place with stakes or clips, making sure they’re not twisted or kinked, which could obstruct water flow, and then you’ll be ready to add the drip irrigation emitters.

    Installation

    Not surprisingly, installing a drip irrigation system is a straightforward process. You’ll need to gather your materials and follow the manufacturer’s instructions. Start by laying out your tubing and fittings, then connect them according to your plan.

    Connecting the system to a water source

    Similarly, setting up the system to connect to a water source is easy. You will need to attach the main line to a faucet or hose, making sure it’s secure and leak-free. Your goal is to get water flowing to your plants efficiently.

    Installing emitters and filters

    Behinding every good drip irrigation system are well-placed emitters and filters. You will place emitters near your plants, spacing them to ensure each plant gets the right amount of water. Filters keep your system running smoothly.

    Consequently, as you install emitters and filters, you’re ensuring your plants get the water they need, without wasting a drop. You’ll be amazed at how much healthier your plants will be, and how much water you’ll save, with your new drip irrigation system up and running.

    Testing

    Despite your best efforts, issues can arise. You’ll need to test your drip irrigation system to ensure it’s working properly. This involves checking for leaks, pressure, and flow rate. You’ll want to identify and fix any problems before they become major issues.

    Checking for leaks and pressure

    With your system turned on, inspect the tubes and fittings for signs of moisture or water droplets. You’ll need to check the pressure gauge to ensure it’s within the recommended range for your system. This step will help you identify any areas that need attention.

    Adjusting the system as needed

    Adjusting the system to your specific needs is key. You’ll need to tweak the emitters, tubes, and fittings to achieve the perfect flow rate and pressure. This may involve tightening loose connections or replacing damaged parts.

    In addition, you may need to adjust the system’s layout or add more emitters to achieve optimal coverage. You’ll want to consult your system’s manual or manufacturer’s guidelines for specific instructions on making adjustments. As you make these tweaks, you’ll be able to fine-tune your drip irrigation system to deliver the right amount of water to your plants, exactly where they need it.

    Maintenance

    Keep your drip irrigation system running smoothly by performing regular checks. You can find more detailed information on the installation process at How to Install Drip Irrigation Systems, but for maintenance, focus on the basics.

    Regular inspections and cleaning

    Inspections of your drip irrigation system should be done frequently to ensure all parts are working correctly. You’ll want to check for clogs, leaks, and damaged tubes, cleaning or replacing them as needed to keep your system efficient.

    Troubleshooting common issues

    Before you start troubleshooting, identify the source of the issue. You’ll need to check the water pressure, emitters, and tubing for problems.

    Considering the complexity of drip irrigation systems, troubleshooting can be challenging. You’ll need to be methodical, checking each component separately to identify the root cause of the problem, whether it’s a clogged emitter or a kinked tube, and then take the appropriate steps to fix it, ensuring your system is working as intended to water your plants effectively.

    Final Words

    To wrap up, you’ve now got the basics to install a drip irrigation system. You’ve learned to plan, lay out, and connect your system. With your new setup, you’ll save water and your plants will thrive. Your hard work will pay off as you see your garden flourish. You can now enjoy the benefits of efficient watering and a healthier landscape, all thanks to your own hands.

    FAQ

    Q: What are the basic components of a drip irrigation system and how do they work together?

    A: A drip irrigation system consists of a water source, filter, pressure regulator, tubing, emitters, and fittings. The water source supplies water to the system, which is then filtered to remove debris and sediments. The pressure regulator ensures that the water pressure is consistent throughout the system. The tubing carries the water to the emitters, which are placed near the roots of the plants and release water droplets at a slow rate. The fittings connect the various components of the system together, allowing for a customized layout and easy maintenance.

    Q: How do I determine the right size of the drip irrigation system for my garden or yard?

    A: To determine the right size of the drip irrigation system, you need to calculate the total water requirements of your plants. This depends on factors such as the type of plants, soil type, climate, and the area to be irrigated. You can use an online drip irrigation calculator or consult with a professional to determine the correct flow rate and pressure requirements for your system. Additionally, consider the maximum flow rate of your water source and the maximum pressure that your system can handle.

    Q: What are the steps involved in installing a drip irrigation system?

    A: The steps involved in installing a drip irrigation system include planning and designing the system, laying out the tubing and emitters, connecting the components, testing the system, and making any necessary adjustments. Start by mapping out your garden or yard and identifying the areas that need irrigation. Lay out the tubing and emitters according to your plan, making sure to space the emitters correctly for optimal water distribution. Connect the components, including the filter, pressure regulator, and fittings, and test the system to ensure it is working properly.

    Q: How do I maintain and troubleshoot my drip irrigation system to ensure it continues to work efficiently?

    A: Regular maintenance is vital to ensure that your drip irrigation system continues to work efficiently. Check the system regularly for signs of wear and tear, such as cracked or damaged tubing, clogged emitters, or dirty filters. Clean or replace the filters as needed, and inspect the emitters for clogs or mineral buildup. Also, check the system for leaks and make any necessary repairs. If you notice a decrease in water pressure or flow rate, check the pressure regulator and adjust it as needed. Additionally, consider flushing the system periodically to remove any debris or sediment that may have accumulated.

    Q: Can I install a drip irrigation system myself, or do I need to hire a professional?

    A: While it is possible to install a drip irrigation system yourself, it may be helpful to hire a professional if you are not familiar with the components or the installation process. A professional can help you design and install a system that meets your specific needs and ensures that it is installed correctly. However, if you are comfortable with DIY projects and have a small to medium-sized garden or yard, you can install a drip irrigation system yourself with the help of online tutorials and manufacturer instructions. Be sure to follow all safety precautions and local regulations when installing your system.

How to Make Your Own Natural Cleaning Products

As you strive to create a healthier and more sustainable home, you’re likely looking for ways to reduce your reliance on harsh chemicals. You can start by making your own natural cleaning products, a simple and effective way to keep your space clean and green. With just a few simple ingredients, you can create a range of effective and eco-friendly cleaners that are perfect for your home. You’ll be amazed at how easy it is to get started and make a positive impact on your health and the environment.

Key Takeaways:

To create your own natural cleaning products, consider the following points:

  • Using necessary oils and plant-based ingredients can help you make effective and eco-friendly cleaning solutions that are gentle on surfaces and the environment.
  • Combining baking soda and vinegar can create a powerful cleaning agent for tackling tough dirt and grime without the need for harsh chemicals.
  • Making your own natural cleaning products allows you to avoid toxic chemicals found in many commercial cleaners, promoting a healthier home and reducing your environmental footprint.

Benefits of Natural Cleaning Products

Before making the switch to natural cleaning products, you’ll want to understand the advantages they offer. Not only are they better for the environment, but they also provide a healthier alternative for you and your family.

Environmental Advantages

Behind the scenes, traditional cleaning products can harm the planet, but natural cleaning products offer a more eco-friendly solution. By choosing natural ingredients, you reduce your carbon footprint and help preserve the environment for future generations.

Health Benefits

Benefits of natural cleaning products extend to your well-being, as they reduce exposure to harsh chemicals and toxins found in traditional cleaning products. You can breathe easier knowing your home is clean and safe.

Another advantage of using natural cleaning products is that they can help alleviate allergies and respiratory issues. As you make your own natural cleaning products, you’ll be able to avoid harmful ingredients and create a healthier living space for you and your loved ones.

Essential Ingredients

Clearly, making your own natural cleaning products requires a few basic ingredients that you likely have at home. You’ll need items like baking soda, white vinegar, and castile soap to get started.

Natural Oils

Ingredients like coconut oil, olive oil, and tea tree oil are excellent additions to your cleaning arsenal, offering antibacterial and antifungal properties that will help you tackle tough messes.

Herbs and Spices

Among the many herbs and spices you can use, lavender, rosemary, and cinnamon are popular choices for their pleasant scents and cleaning properties, which you can incorporate into your homemade cleaning products.

With herbs and spices, you can create unique and effective cleaning solutions that not only clean your home but also leave it smelling fresh and inviting; you can use them to make infusions, tinctures, or even add them directly to your cleaning products for an extra boost of fragrance and cleaning power.

Cleaning Product Recipes

Your journey to a cleaner and greener home starts with exploring various recipes, such as the 21 Natural Cleaner Recipes for Every Area of Your Home found on Martha Stewart’s guide to natural cleaners, which provides you with a comprehensive list to get you started.

All-Purpose Cleaner

Product mixes like baking soda and vinegar can be used to create an all-purpose cleaner that you can use on various surfaces, allowing you to tackle multiple cleaning tasks with ease, making cleaning more efficient and fun for you.

Glass Cleaner

Below are some simple ingredients you can combine to create your own glass cleaner, letting you achieve sparkling windows and surfaces without harsh chemicals, giving you the satisfaction of a job well done.

Another great aspect of making your own glass cleaner is the ability to customize the ingredients to your preference, such as using club soda for a streak-free shine or adding a few drops of lemon necessary oil for a refreshing scent, making the experience of cleaning more enjoyable for you.

Tips for Effective Cleaning

Despite the many benefits of natural cleaning products, you may still encounter some challenges. Consider the following:

  • Always spot test
  • Use microfiber cloths

For more ideas, visit Natural Cleaning Recipes – 20 DIY Chemical Free Vegan Tips. Assume that with practice, you’ll become more efficient at cleaning your home naturally.

Cleaning Techniques

Techniques for effective cleaning include using the right tools and taking your time. You’ll find that with the right approach, cleaning can be easier and more enjoyable, allowing you to keep your home sparkling and clean.

Organization Strategies

Organizing your cleaning supplies and schedule can help you stay on track. You’ll be able to find what you need quickly and easily, making the cleaning process more efficient.

The key to successful organization is creating a system that works for you. You can start by designating a specific area for your cleaning supplies and setting aside time each week to tidy up. As you get into a routine, you’ll find that your home stays cleaner and you have more free time to enjoy the things you love. You can also consider implementing a seasonal cleaning schedule to tackle deeper cleaning tasks throughout the year.

Safety Precautions

Unlike commercial cleaning products, your homemade solutions may not have childproof packaging or clear warning labels, so you’ll need to take extra care when using and storing them.

Handling Chemicals

Handling hazardous materials requires attention to detail, and you should always wear gloves and work in a well-ventilated area to avoid exposure to harsh fumes or skin irritation.

Storage and Disposal

Behind every successful homemade cleaning product is a thoughtful storage plan, and you’ll want to keep your solutions out of reach of children and pets, and label them clearly so you can easily identify their contents.

Chemicals can be hazardous if not disposed of properly, so you’ll want to check local regulations for guidance on how to safely dispose of any leftover materials or containers, and take steps to minimize your environmental footprint by reusing or recycling whenever possible, making your cleaning routine not only effective but also eco-friendly, and you can feel good about the positive impact you’re having on your home and the planet.

Customizing Your Cleaning Products

Now that you have the basics of making your own natural cleaning products, you can start customizing them to fit your preferences and needs. You can experiment with different ingredients and recipes to create unique and effective cleaning solutions that work best for you and your home.

Fragrance Options

Across the wide range of necessary oils available, you can choose the ones that you like best to add a pleasant scent to your cleaning products, making cleaning a more enjoyable experience for you.

Texture and Consistency

Against the backdrop of various textures and consistencies, you can adjust the ingredients to achieve the desired feel and performance for your cleaning products, whether you prefer a smooth paste or a liquid solution.

Also, considering your specific cleaning tasks and the surfaces you will be cleaning, you can modify the texture and consistency of your products to ensure they are effective and gentle on the surfaces, making it easier for you to get the job done efficiently and effectively.

Final Words

Drawing together all the tips and tricks, you now have the knowledge to create your own natural cleaning products. You can confidently make your own cleaning solutions, and for more inspiration, visit How to Make Simple Homemade Cleaning Sprays. With your new skills, you’ll enjoy a cleaner, healthier home, and the satisfaction of doing it yourself.

FAQ

Q: What are the benefits of making my own natural cleaning products?

A: Making your own natural cleaning products offers several benefits, including reducing exposure to harsh chemicals, customizing products to your specific cleaning needs, and saving money. Natural ingredients like baking soda, vinegar, and lemon juice are often cheaper and more environmentally friendly than commercial cleaning products. Additionally, homemade cleaning products can be tailored to your specific allergies or sensitivities, making them a great option for those with sensitive skin or respiratory issues.

Q: What are some common natural ingredients used in homemade cleaning products?

A: Some common natural ingredients used in homemade cleaning products include baking soda, white vinegar, lemon juice, castile soap, and important oils. Baking soda is a natural abrasive and can be used for scrubbing surfaces, while white vinegar is a natural disinfectant and can be used to clean countertops and sinks. Lemon juice has antiseptic properties and can be used to clean surfaces and remove stains. Castile soap is a gentle and biodegradable soap that can be used for a variety of cleaning tasks, and important oils like tea tree oil and lavender oil have antibacterial properties and can be used to freshen and clean the air.

Q: How do I get started with making my own natural cleaning products?

A: To get started with making your own natural cleaning products, you’ll need to gather some basic ingredients and supplies, such as a spray bottle, a mixing bowl, and a funnel. You can find many simple recipes online or in books, and you can start by making a few basic products like all-purpose cleaner and dish soap. It’s also a good idea to labels and date your homemade cleaning products, so you can keep track of what you have and how long it’s been since you made it. Additionally, be sure to follow safety precautions when handling and storing your homemade cleaning products, such as keeping them out of reach of children and pets.

Q: Are homemade natural cleaning products as effective as commercial cleaning products?

A: Homemade natural cleaning products can be just as effective as commercial cleaning products, but it may take some trial and error to find the right recipes and techniques for your specific cleaning needs. Natural ingredients can be just as powerful as chemical-based ingredients, but they may require a bit more elbow grease and time to work. For example, a mixture of baking soda and vinegar can be just as effective at removing tough stains as a commercial cleaner, but it may require some scrubbing and rinsing to get the job done. With a little patience and practice, you can find homemade natural cleaning products that work just as well as commercial products.

Q: Can I customize my homemade natural cleaning products to suit my specific cleaning needs and preferences?

A: Yes, one of the best things about making your own natural cleaning products is that you can customize them to suit your specific cleaning needs and preferences. For example, if you have allergies or sensitivities, you can avoid using ingredients that trigger your allergies and opt for gentler alternatives instead. You can also customize the scent and texture of your homemade cleaning products by using different important oils and ingredients. Additionally, you can adjust the concentration and consistency of your homemade cleaning products to suit the specific task at hand, such as making a stronger solution for tough messes or a gentler solution for delicate surfaces.

The Best Kitchen Gadgets for Every Home Chef

As you explore your culinary skills, you’ll find that having the right tools in your kitchen makes all the difference. Your cooking experience will be easier and more enjoyable with the right gadgets. You can simplify meal prep, reduce cooking time, and achieve perfect results. In this post, you’ll discover the necessary kitchen gadgets that will take your home cooking to the next level, making you a more confident and skilled home chef.

Key Takeaways:

To become an efficient home chef, it is vital to have the right kitchen gadgets at your disposal. Here are the key points to consider:

  • Investing in a stand mixer can greatly simplify tasks such as baking and food preparation, saving you time and effort in the kitchen.
  • A sous vide machine is a valuable addition to any kitchen, allowing for precise temperature control and consistent results when cooking a variety of dishes.
  • A immersion blender is a versatile kitchen tool that can be used for soups, sauces, and other liquid-based dishes, making it a must-have for every home chef.

Essential Tools

To get started with cooking, you need to have the right tools in your kitchen. Investing in a few imperative gadgets will make a big difference in your cooking experience.

Must-Have Knives

Besides the basic kitchen utensils, a good set of knives is vital for any home chef. You will need a variety of knives, including a chef’s knife, paring knife, and serrated knife, to prepare ingredients efficiently.

Reliable Cookware

After selecting your knives, it’s time to focus on cookware. You should invest in a few reliable pots and pans that can withstand high temperatures and distribute heat evenly, making cooking easier and faster.

To take your cooking to the next level, consider investing in a stainless steel or non-stick cookware set, as these materials are durable and easy to clean, allowing you to focus on perfecting your cooking techniques and exploring new recipes in your kitchen.

Baking Delights

Even if you’re a beginner in the kitchen, you can still create amazing baked goods with the right tools. You can start by checking out The Kitchen Starter Kit: Essential Tools for Every Cook to get an idea of the basics you need to get started.

Mixers and Measuring Cups

Aiding your baking process are mixers and measuring cups, which help you achieve the perfect blend of ingredients and precise measurements, allowing you to focus on decorating and presenting your creations.

Baking Sheets and Molds

To take your baking to the next level, consider investing in high-quality baking sheets and molds, which will help you achieve professional-looking results and make food preparation easier.

Indeed, baking sheets and molds are necessary for any home chef, as they provide the foundation for your baked goods to turn out perfectly, and with the right ones, you’ll be able to create a wide variety of dishes, from cookies and cakes to bread and pastries, and you’ll appreciate the durability and ease of use they offer.

Cooking Convenience

Keep your kitchen running smoothly with gadgets that make cooking easier and more efficient. You’ll appreciate the time-saving benefits and improved results that come with using the right tools.

Slow Cookers and Pressure Cookers

By investing in a slow cooker or pressure cooker, you can prepare delicious meals with minimal effort. You’ll be able to cook a variety of dishes with ease, from hearty stews to tender meats.

Food Processors and Blenders

An imperative addition to any kitchen, food processors and blenders help you prepare ingredients quickly and evenly. You can chop, slice, and puree with ease, making meal prep a breeze.

Another advantage of food processors and blenders is their versatility. You can use them to make a wide range of dishes, from soups and sauces to desserts and dips, allowing you to explore your creativity in the kitchen and try new recipes with ease.

Meal Preparation

Not every home chef has the time to spend hours in the kitchen, which is why having the right gadgets can make all the difference in your meal preparation. With the right tools, you can chop, slice, and dice ingredients quickly and efficiently, making cooking a breeze.

Choppers and Graters

Around your kitchen, you’ll find that choppers and graters are crucial for preparing a variety of dishes, from salads to soups. You can use them to chop nuts, grate cheese, and even puree fruits and vegetables, making them a must-have in your kitchen arsenal.

Colanders and Strainers

The key to perfectly cooked pasta, rice, and vegetables is proper drainage, which is where colanders and strainers come in. You can use them to drain excess water from your ingredients, making them a simple yet effective tool in your meal preparation.

Colanders are especially useful when you’re cooking for a large group, as they allow you to drain multiple servings at once. You can place your colander in the sink or use a stand-alone model, making it easy to drain and serve your dishes with ease, and adding convenience to your cooking routine.

Dining and Serving

Once again, you’ll want to make a great impression when it comes to serving your dishes, and having the right kitchen gadgets can make all the difference. You’ll need items that make serving and dining a breeze, allowing you to focus on enjoying your meal with family and friends.

Plates and Platters

Besides the basic dinner plates, you’ll want to consider platters and serving dishes that can add a touch of elegance to your table setting, allowing you to serve your dishes in style, making your dining experience even more enjoyable.

Glasses and Wine Openers

Plattered with an array of glasses and wine openers, your dining setup will be complete, you’ll have everything you need to serve your favorite beverages, from water and juice to wine and cocktails, making every meal a special occasion.

Hence, when choosing glasses and wine openers, you should consider your personal style and the type of entertaining you plan to do, selecting items that fit your needs and preferences, ensuring that you have the perfect tools to enhance your dining experience, and make serving your guests a pleasure, allowing you to enjoy quality time with your loved ones.

Safety and Maintenance

Unlike other areas of your kitchen, safety and maintenance are often overlooked until it’s too late. You can find more information on The Best Pro Cooking Tools for Your Home Kitchen to ensure your kitchen is well-equipped.

Kitchen Fire Extinguishers

Maintenance of your kitchen’s fire safety equipment is vital, you should regularly check your fire extinguisher to ensure it’s in working order.

Cleaning Tools and Supplies

By investing in the right cleaning tools, you can keep your kitchen clean and hygienic, which is necessary for your health and safety.

Cleaning your kitchen regularly can be a daunting task, but with the right cleaning tools and supplies, you can make it easier and more efficient, allowing you to focus on what you do best – cooking delicious meals for your family and friends.

To wrap up

Summing up, you now have the best kitchen gadgets to enhance your cooking experience. With these tools, you can take your culinary skills to the next level. To further equip your kitchen, check out 29 Kitchen Gadgets That Chefs Actually Use for more expert-recommended necessarys to upgrade your cooking routine and make your kitchen more efficient, allowing you to cook like a pro in your own home.

FAQ

Q: What are the must-have kitchen gadgets for a beginner home chef?

A: For a beginner home chef, some must-have kitchen gadgets include a stand mixer, immersion blender, silicone spatulas, a food processor, and a slow cooker. These gadgets will help with tasks such as mixing, blending, cooking, and food preparation, making cooking easier and more efficient. They are also versatile and can be used for a variety of dishes, from baking to meal prep.

Q: How can I choose the best kitchen gadgets for my specific cooking needs?

A: To choose the best kitchen gadgets for your specific cooking needs, consider the types of dishes you cook most often and the tasks you perform regularly in the kitchen. For example, if you bake frequently, a kitchen scale and a pastry brush may be imperative gadgets for you. If you cook a lot of soups and stews, an immersion blender or a Dutch oven may be more suitable. Reading reviews and researching different gadgets can also help you make an informed decision.

Q: Are expensive kitchen gadgets worth the investment for a home chef?

A: While expensive kitchen gadgets may offer advanced features and high-quality construction, they may not always be worth the investment for a home chef. It’s imperative to consider your budget and cooking frequency before purchasing a gadget. However, some high-end gadgets, such as a stand mixer or a slow cooker, can be worth the investment if you use them frequently and they can help you cook more efficiently and effectively. On the other hand, cheaper alternatives may be available for gadgets that you only use occasionally.

Q: How can I store and organize my kitchen gadgets to maximize kitchen space?

A: To store and organize your kitchen gadgets, consider using a utensil organizer or a gadget holder on your countertop or in a drawer. You can also install a pegboard on a wall or the back of a door to hang your gadgets, keeping them within easy reach. Additionally, labeling your gadgets and storing them in designated areas can help you quickly find what you need and keep your kitchen clutter-free. Regularly cleaning and maintaining your gadgets can also help prevent clutter and keep your kitchen organized.

Q: What are some innovative kitchen gadgets that can help home chefs cook more efficiently and creatively?

A: Some innovative kitchen gadgets that can help home chefs cook more efficiently and creatively include a spiralizer for creating zucchini noodles, a sous vide machine for precise temperature control, and a smart thermometer for monitoring cooking temperatures. Other gadgets, such as a food dehydrator or a ice cream maker, can help home chefs experiment with new recipes and ingredients. These gadgets can help take your cooking to the next level and make meal prep and cooking more enjoyable and exciting.

How to Build a Fire Pit in Your Backyard

Planning

While building a fire pit in your backyard can be a fun project, you need to start with a solid plan. You’ll need to consider the size and style of your fire pit, as well as the materials you’ll use to build it.

Choosing the Location

Around the area you plan to build your fire pit, ensure it’s safe and accessible. You’ll want to choose a spot that’s level and away from flammable materials.

Considering Local Regulations

Toward the beginning of your planning process, you should check with your local government to see if there are any regulations or restrictions on building a fire pit in your area. You’ll need to ensure you’re in compliance with all local ordinances.

Understanding the local regulations will help you avoid any potential issues or fines. You’ll need to check if you need a permit to build a fire pit, and if there are any specific guidelines you need to follow. You should also check if there are any restrictions on the size or type of fire pit you can build, as well as any rules about the materials you can use.

Key Takeaways:

To build a fire pit in your backyard, consider the following points:

  • Choose a safety location for your fire pit, away from flammable materials and overhanging branches, to minimize the risk of accidents and ensure a safe gathering place.
  • Select the right materials, such as fireproof brick, stone, or concrete, to construct your fire pit, and consider the size and shape that best fits your outdoor space and needs.
  • Follow local regulations and building codes when building your fire pit, and take necessary precautions to contain the fire and prevent damage to your property and the environment.

Design

There’s more to building a fire pit than just digging a hole and stacking stones. You’ll need to consider the overall aesthetic you want to achieve in your backyard.

Selecting the Fire Pit Style

To start, you’ll need to choose a style that fits your outdoor decor. You can opt for a modern gas-fired pit or a traditional wood-burning one, depending on your preferences.

Determining the Size and Materials

On the basis of your yard’s layout and the space available, you’ll determine the size of your fire pit. You’ll also need to decide on the materials, such as stone, brick, or metal, that will suit your style.

A key factor in determining the size and materials is considering how you plan to use your fire pit. You’ll want to think about the number of people it will need to accommodate, as well as the type of gatherings you’ll be hosting, to ensure you choose a size and material that fits your needs. You’ll need to balance your desired size with the space available in your yard, taking care not to overwhelm the surrounding area.

Preparation

If you’re looking to build a fire pit, you’ll need to start by laying the groundwork. This involves several key steps that will ensure your project gets off to a solid start.

Gathering Tools and Equipment

Beneath the surface of a successful fire pit build lies a foundation of proper tools and equipment. You’ll need to gather items like a shovel, trowel, and level to get started.

Preparing the Site

Gathering your thoughts, you’ll need to prepare the site where your fire pit will sit. You’ll want to clear the area of any debris and vegetation.

Due to the importance of a level surface, you’ll need to take your time when preparing the site. You’ll be working with heavy materials, and a uneven surface can lead to instability and potential hazards. Take a few minutes to ensure your site is level and clear, and you’ll be well on your way to building a safe and enjoyable fire pit.

Construction

Now that you have planned your fire pit, it’s time to start building. You can find more information on what is the cheapest way to build a backyard fire pit to help you make informed decisions.

Building the Fire Pit Base

Above all, you need a solid foundation for your fire pit. You will start by digging a hole and laying down a layer of sand and gravel to provide drainage and stability.

Installing the Fire Ring and Grate

Installing the fire ring and grate is the next step. You will place the fire ring in the center of the pit and add the grate on top to hold the wood.

With the fire ring and grate in place, you can now add the finishing touches to your fire pit. You will need to surround the pit with stone or brick to contain the fire and add a decorative touch to your backyard. You should choose materials that fit your style and budget, and make sure to follow all safety guidelines when building and using your fire pit.

Safety Features

Once again, you’ll want to consider safety when building your fire pit, as outlined in the guide on How to Build a Fire Pit. You’ll need to think about protecting yourself and your property from the fire.

Installing a Spark Guard

Safely containing the fire is your top priority, so you’ll need to install a spark guard to prevent embers from escaping.

Adding a Fire Pit Ring

Any fire pit needs a sturdy ring to contain the flames, and you’ll want to choose one that fits your design.

Ring selection is where you can get creative with your fire pit design, choosing from materials like steel or stone to match your yard’s aesthetic, and you’ll want to ensure it’s the right size for your fire pit.

Finishing Touches

Your fire pit is nearly complete, with the main structure in place. Now it’s time to add the final details to make it a cozy and inviting space.

Adding Decorative Stones or Bricks

Across the perimeter of your fire pit, you can add decorative stones or bricks to give it a polished look and define the space.

Installing Lighting and Seating

Luminous string lights or lanterns can be installed around your fire pit to create a warm ambiance in the evenings. You can also add seating, such as benches or Adirondack chairs, to make the space comfortable for relaxation.

For instance, you can position seating to face the fire pit, creating a cozy nook for chilly nights. As you finalize the lighting and seating, consider the overall aesthetic you want to achieve, and make adjustments accordingly to create a space that suits your style and preferences.

You’re looking to build a fire pit in your backyard, a place to gather and warm up on chilly nights. You’ve got the space, now you need the know-how. With basic tools and materials, you can construct a fire pit that’s both functional and safe. You’ll learn how to choose the right location, prepare the site, and build the pit itself, step by step. Your backyard will soon be lit up with a warm and inviting fire.

Summing up

Upon reflecting on the steps to build a fire pit, you’ve got a clear plan. You’ve chosen a spot, dug the pit, and laid the stones. Your backyard now awaits the warmth and light of a crackling fire. With these simple steps, you can enjoy a cozy night by the flames, watching your hard work come to life in the dancing embers of your new fire pit.

FAQ

Q: What are the necessary materials and tools to build a fire pit in my backyard?

A: To build a fire pit, you will need materials such as fireproof bricks or stones, sand, gravel, and a metal ring or pit insert. You will also need tools like a shovel, trowel, level, and a wheelbarrow. Additionally, consider having a fire screen, spark guard, and cooking grate for safety and functionality. Ensure you check local building codes and regulations before starting your project.

Q: How do I choose the perfect location for my backyard fire pit?

A: When deciding on a location for your fire pit, consider the distance from flammable objects such as trees, fences, and your home. Ensure it’s placed on a level surface, away from power lines and overhanging branches. It’s also important to consider the prevailing wind direction to avoid smoke blowing towards your house or neighbor’s yard. Lastly, choose a spot that is easily accessible and offers a comfortable seating area.

Q: What safety precautions should I take when building and using my fire pit?

A: Safety should be your top priority when building and using a fire pit. Start by ensuring your fire pit is at least 10 feet away from anything flammable. Keep a fire extinguisher or a bucket of sand nearby in case of emergencies. When using the fire pit, never leave it unattended, and keep children and pets at a safe distance. Also, follow local burning regulations and take necessary steps to fully extinguish the fire when you’re done.

Q: How do I maintain and clean my fire pit to ensure it lasts for a long time?

A: To maintain your fire pit, start by cleaning it after each use to prevent the buildup of ash and debris. Use a wire brush to scrape out any remaining ash and debris, and then wipe it down with a damp cloth. Regularly inspect the fire pit for any damage or wear and tear, and make repairs as needed. During the off-season, consider covering the fire pit to protect it from the elements. This will help extend its lifespan and keep it in good condition for years to come.

Q: Can I build a fire pit myself, or do I need to hire a professional?

A: While it’s possible to build a fire pit yourself, it depends on the complexity of the design and your level of DIY expertise. Simple fire pits can be built with basic tools and materials, but more complex designs may require professional help. If you’re not comfortable with the construction process or if local regulations require a permit, it may be best to hire a professional. They can ensure the fire pit is built safely and meets all local building codes, providing you with peace of mind and a well-constructed fire pit to enjoy for years to come.

Opaye Skip to content